12 Surprising Tricks You Never Knew About Using Preview on Your Mac

12 Surprising Tricks You Never Knew About Using Preview on Your Mac
Quick Links
- Edit Your Images
- Remove the Background From an Image
- Extract the Subject From an Image
- Undo All Your Edits
- Copy Text, Links, Numbers, and More
- Scan Documents
- Identify Objects in Photos
- Display Photos in a Slideshow
- Create and Encrypt PDFs
- Edit PDFs
- Save Frames From GIFs
- Batch Convert Images
Preview is one of the oldest and most commonly used apps on macOS. Yet if you haven’t taken the time to explore it in detail, you might be surprised to learn that it is a lot more powerful than you thought.
Edit Your Images
You might mostly use Preview’s editing features for things like cropping and resizing images , but it also has some tools you can use for more advanced edits. You can correct the exposure in photos, and it supports layers in a simple way, which enables you to add elements to your images non-destructively.
Go to Tools > Adjust Color to open the edit settings box. In the histogram at the top, drag the left slider to the right to darken the shadows, drag the central slider left or right to brighten or darken the midtones, and drag the right slider to the left to brighten the highlights.
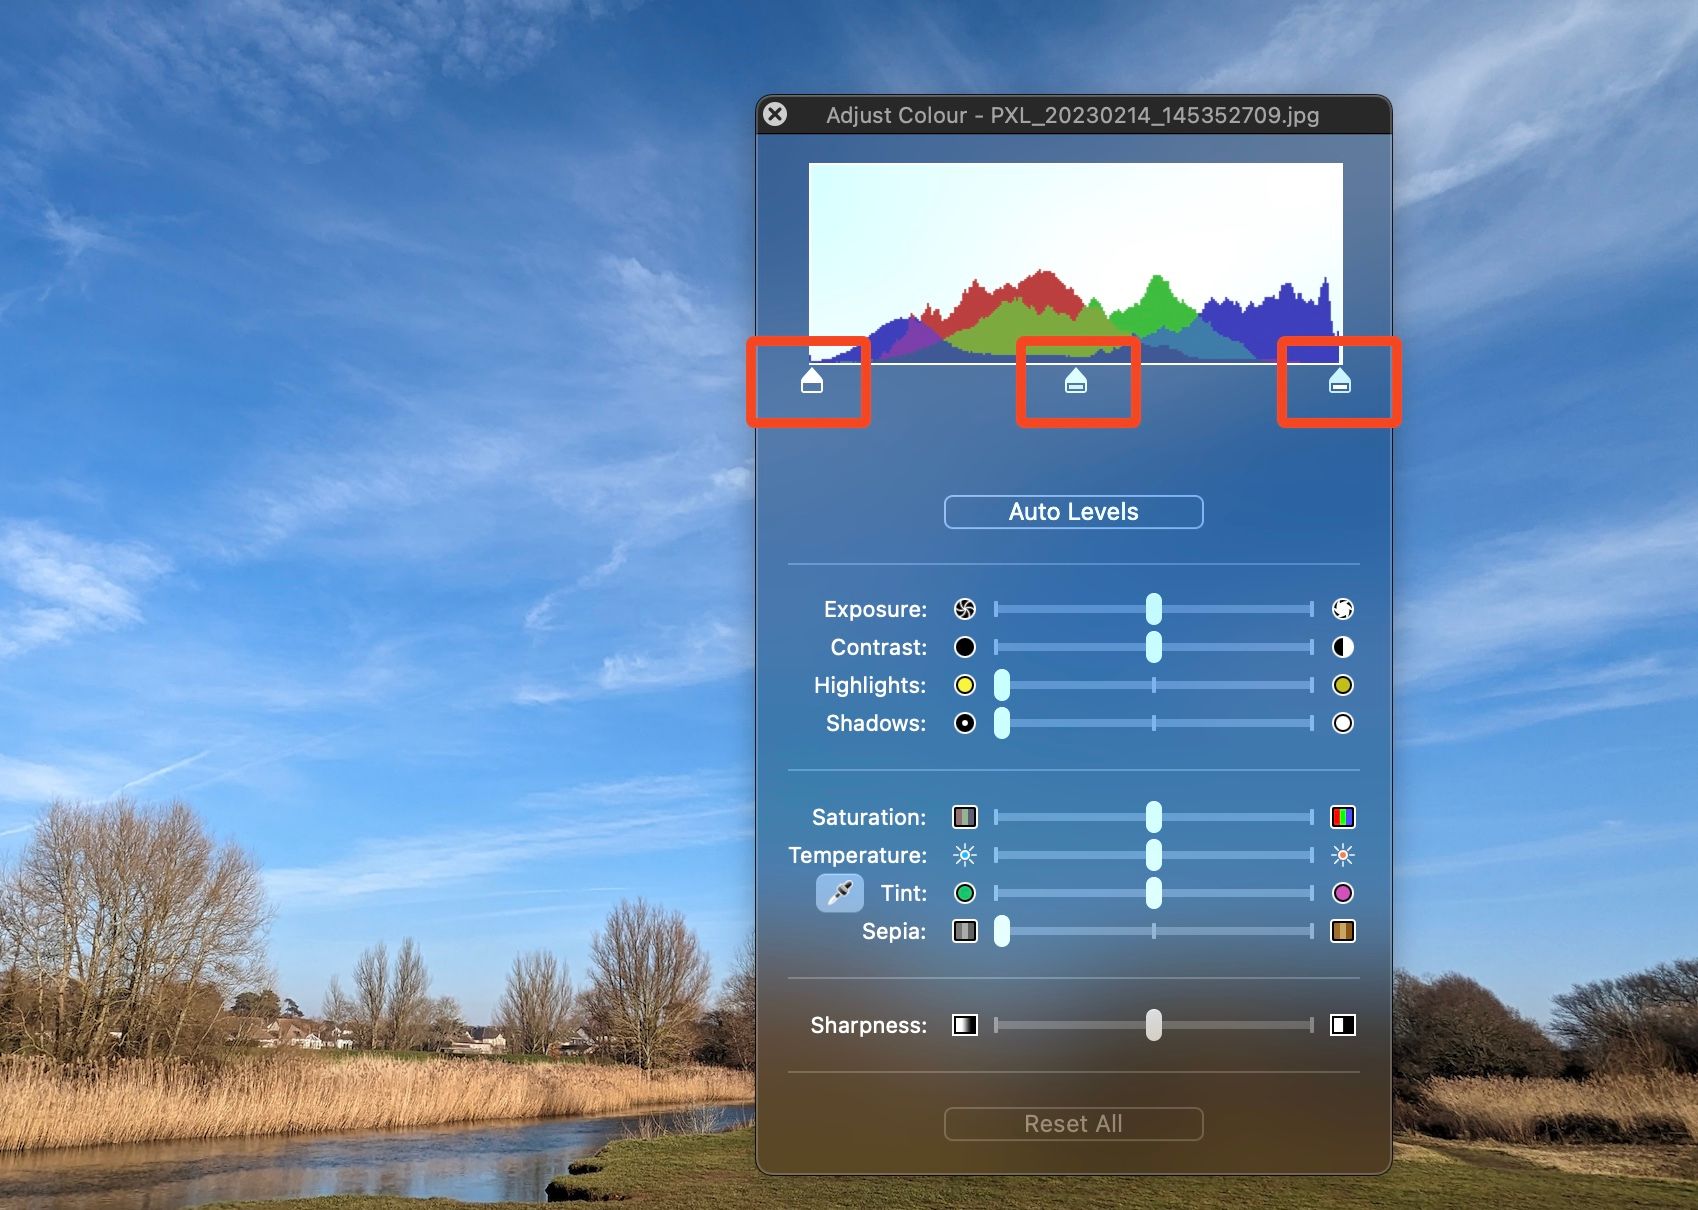
Alternatively, click the “Auto Levels” button to have it done automatically. You can make lots more adjustments here, including to the exposure, colors, and white balance.
If you paste another object onto the top of your image—maybe drawing a box, adding text, or copying and pasting a selection from another image—that object will always be accessible and resizable as if it were on its own layer . Just click to select it, and you can reposition it, resize it, and so on.
Remove the Background From an Image
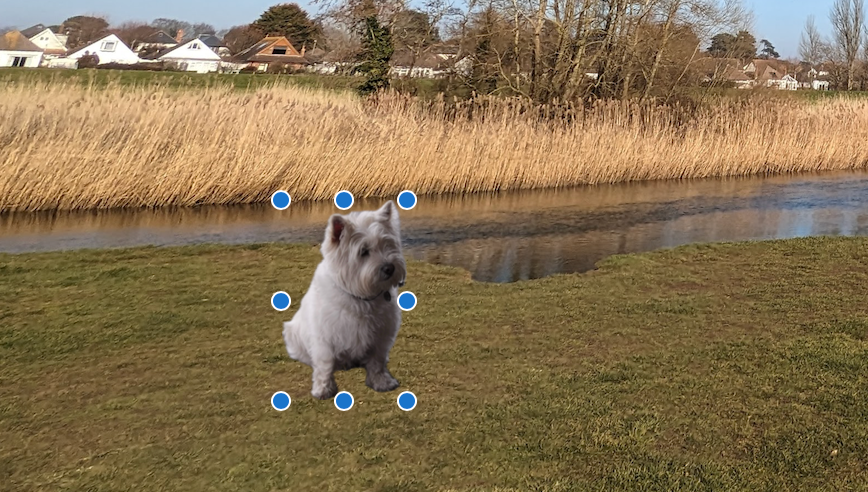
An even more powerful editing feature in Preview is the ability to remove the background from your images. It’s not as good as something like Photoshop, but it works well with photos or illustrations where there’s a clear separation between the foreground and the background.
To use it, go to Tools > Remove Background. When you highlight that option, you’ll see a glowing line around the subject in the image that lets you check that it’s selecting the right thing. If you’re happy, click “Remove Background.”
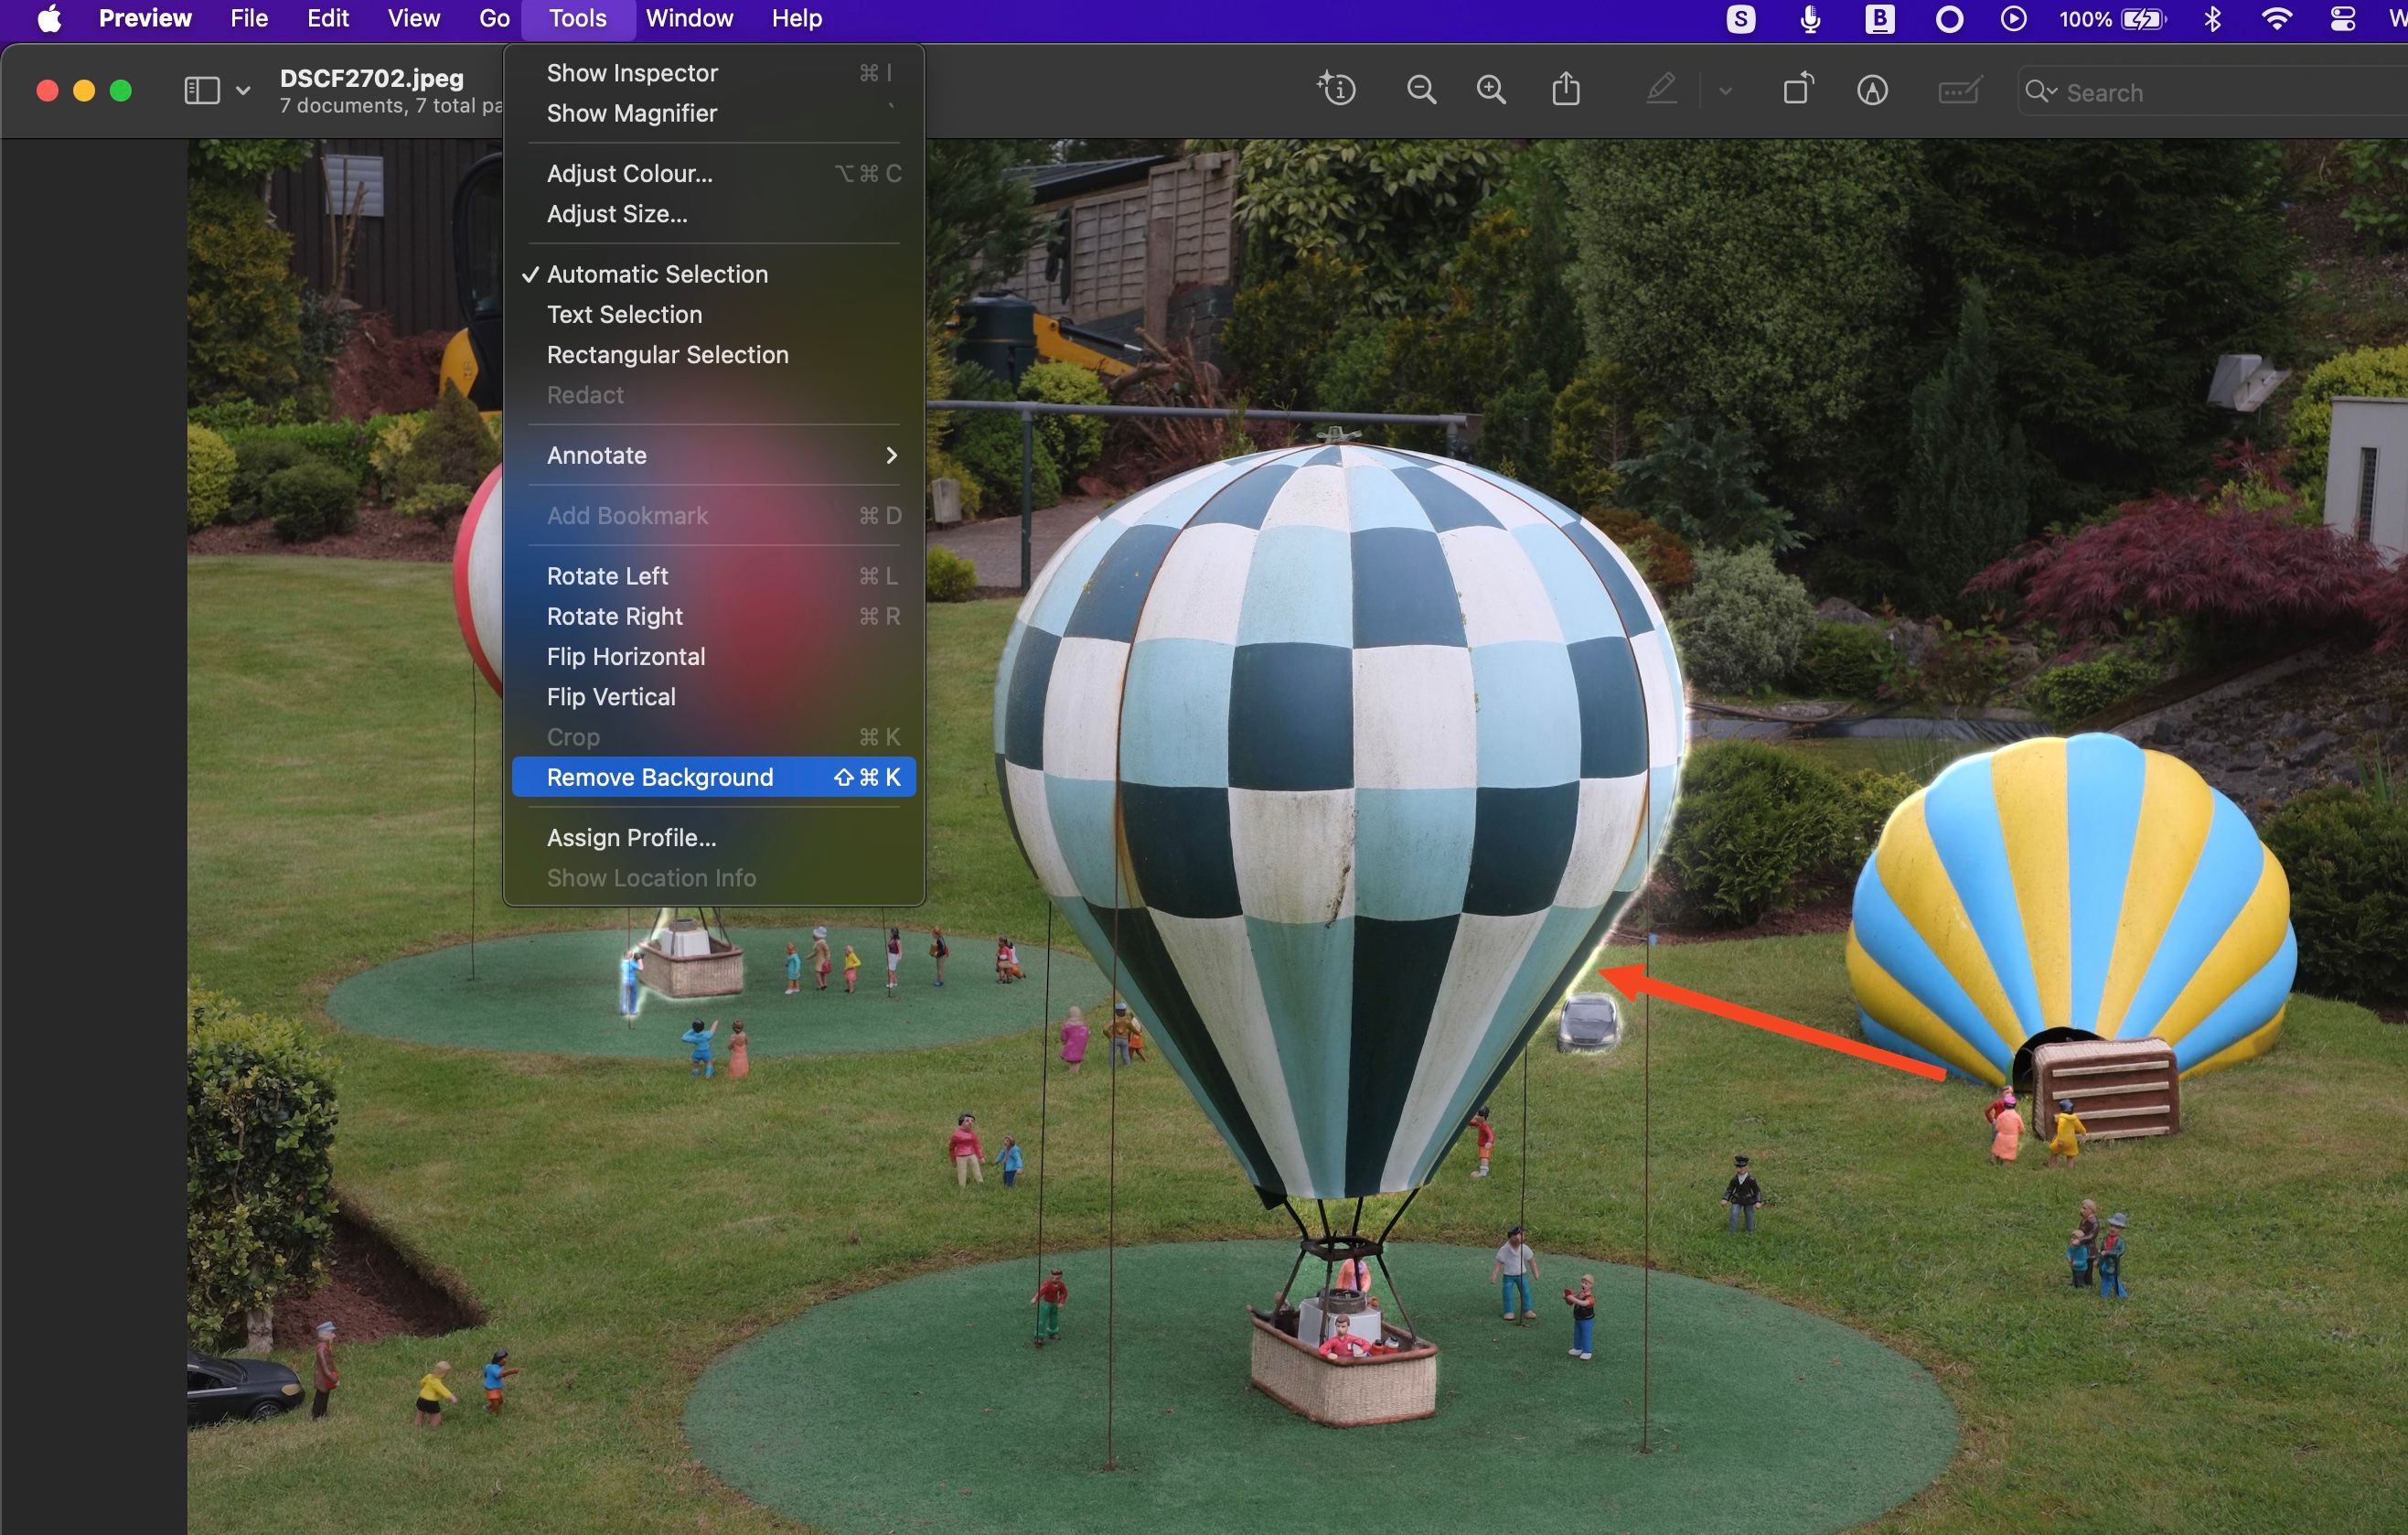
If your image isn’t in the PNG format, you’ll be prompted to convert it first.
Extract the Subject From an Image
As well as removing the background from an image, you can isolate and extract the subject.
Right-click on the photo and select “Copy Subject.” Again, you’ll see the glowing line around the subject in the image when you highlight the option.

The subject will be copied to your clipboard so that you can paste it into another app. Alternatively, go to File > New from Clipboard to create a new image.
Undo All Your Edits
No matter what edits you carry out on your photos, you can undo them all even after you’ve saved the file.
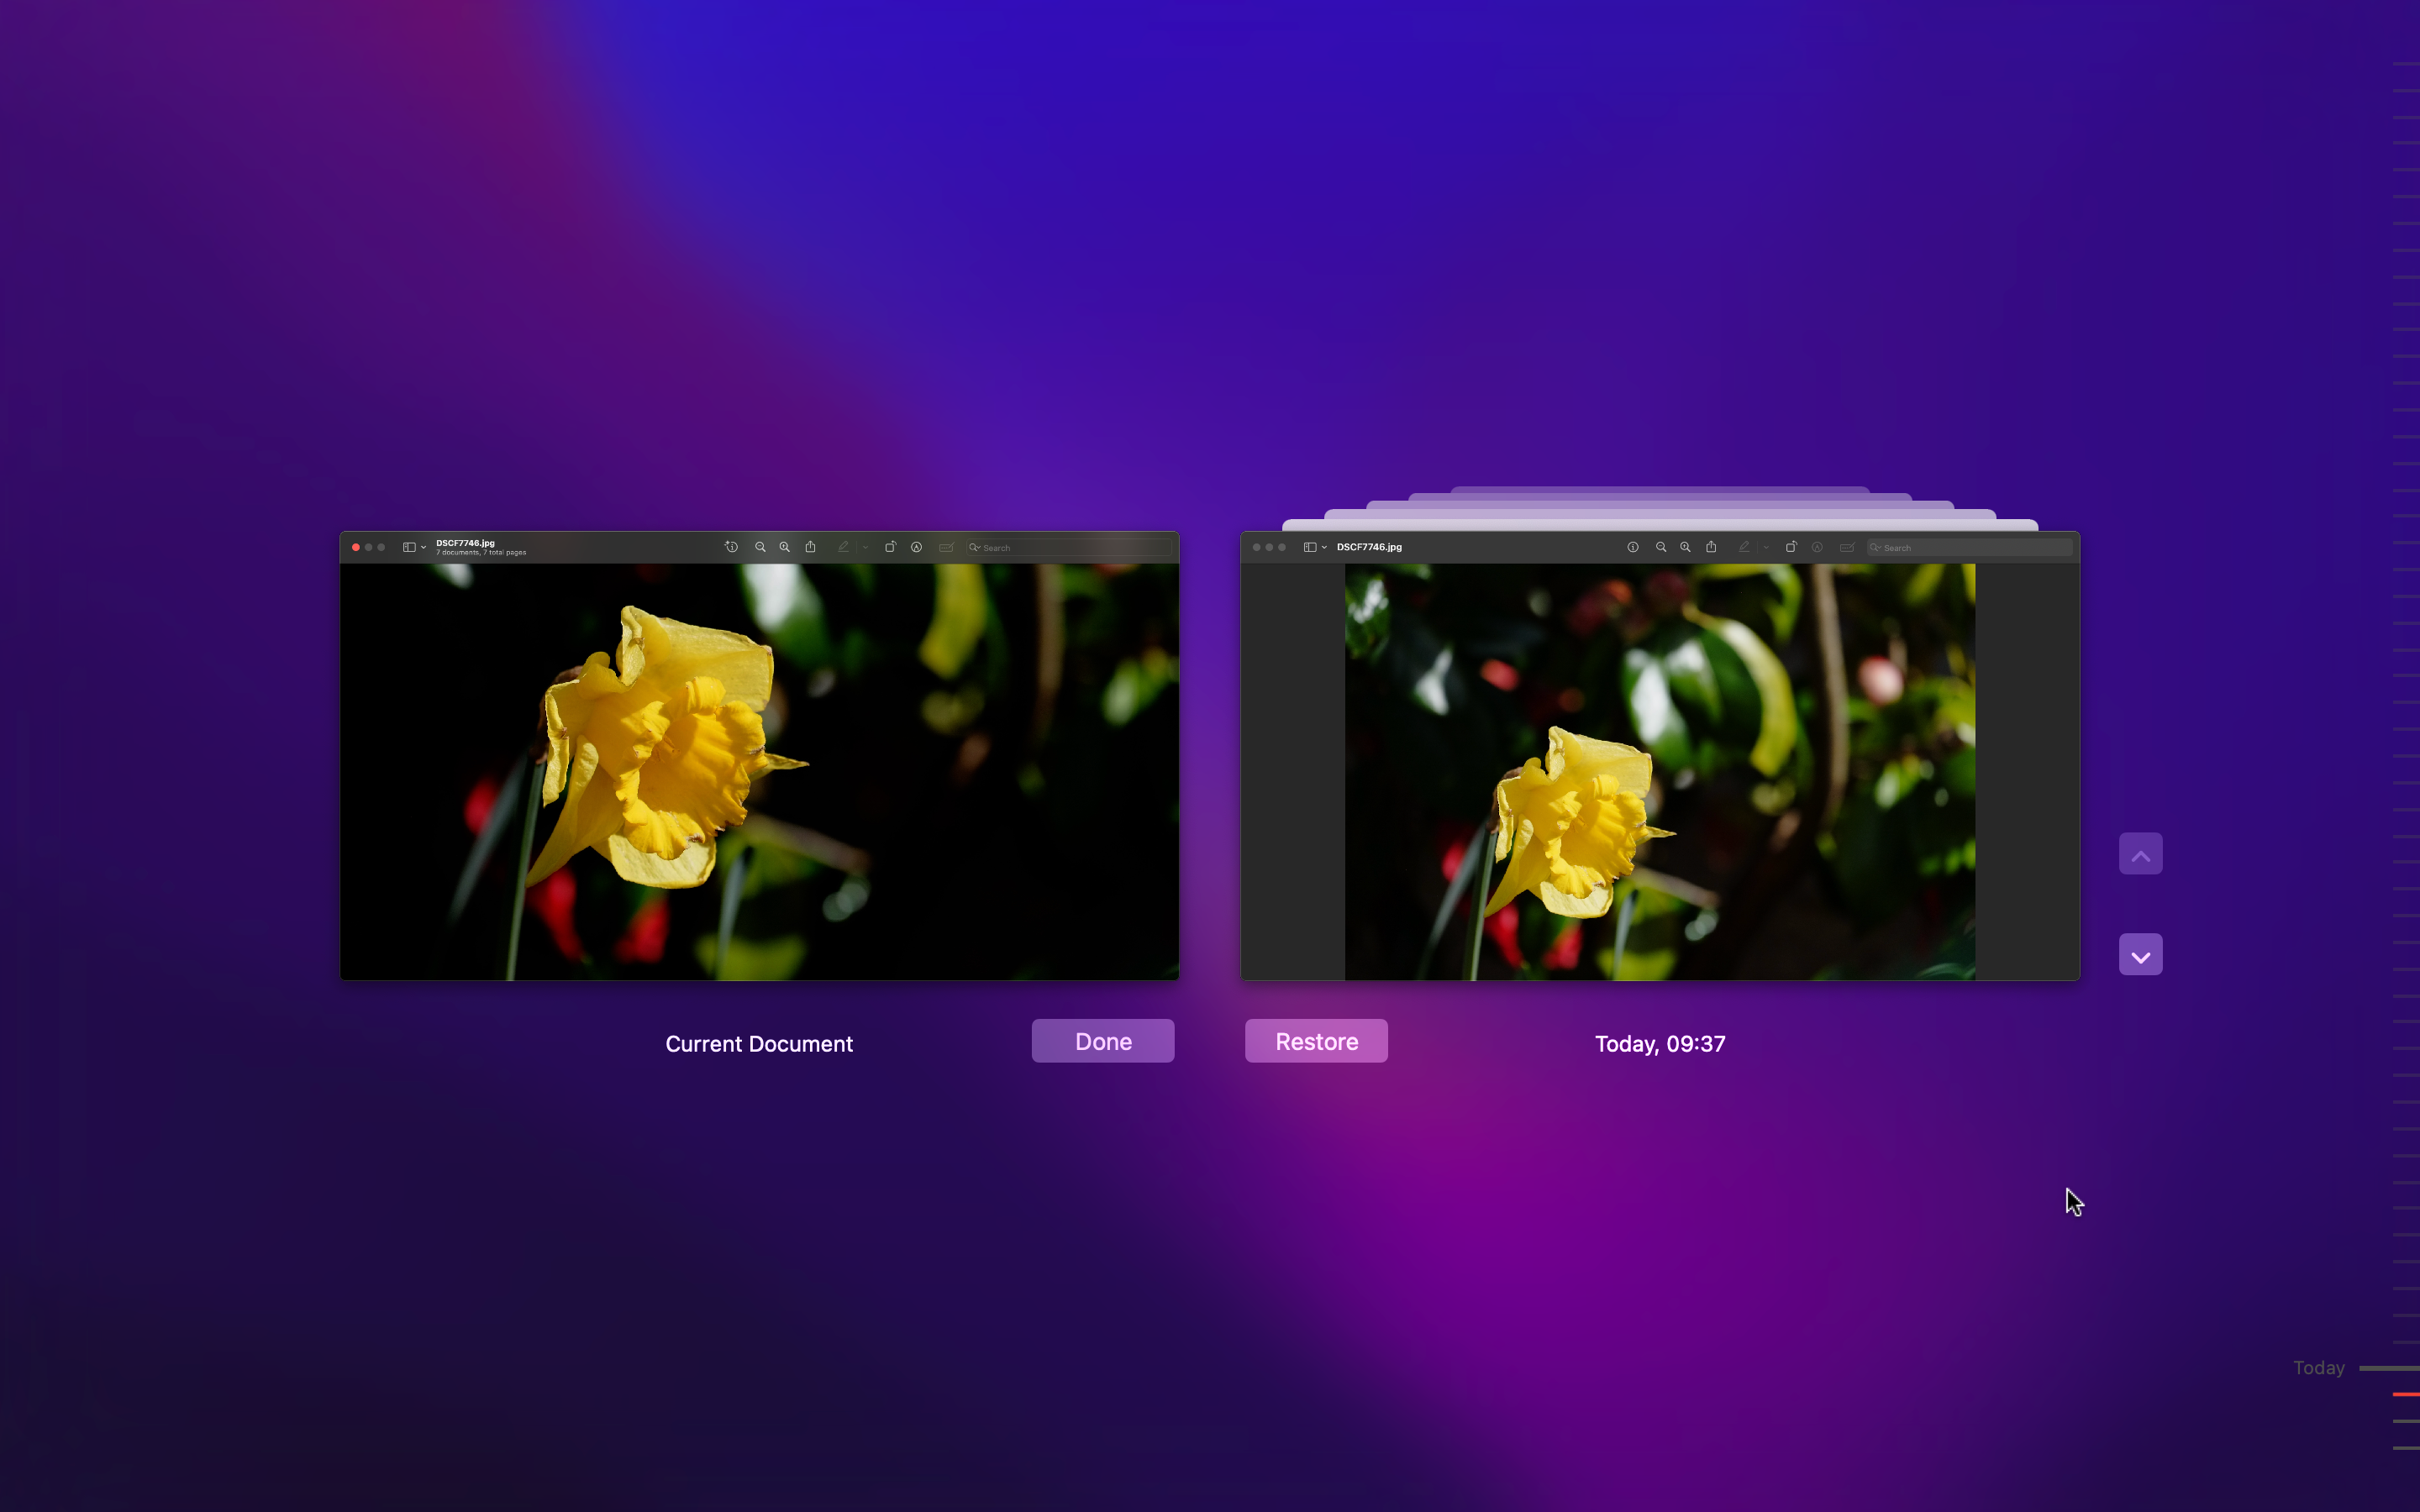
Go to File > Revert To > Browse All Versions and you can see all the previous saves you’ve made. Click “Restore” when you find the one you want. You can go all the way back to the original image if you need to.
Copy Text, Links, Numbers, and More
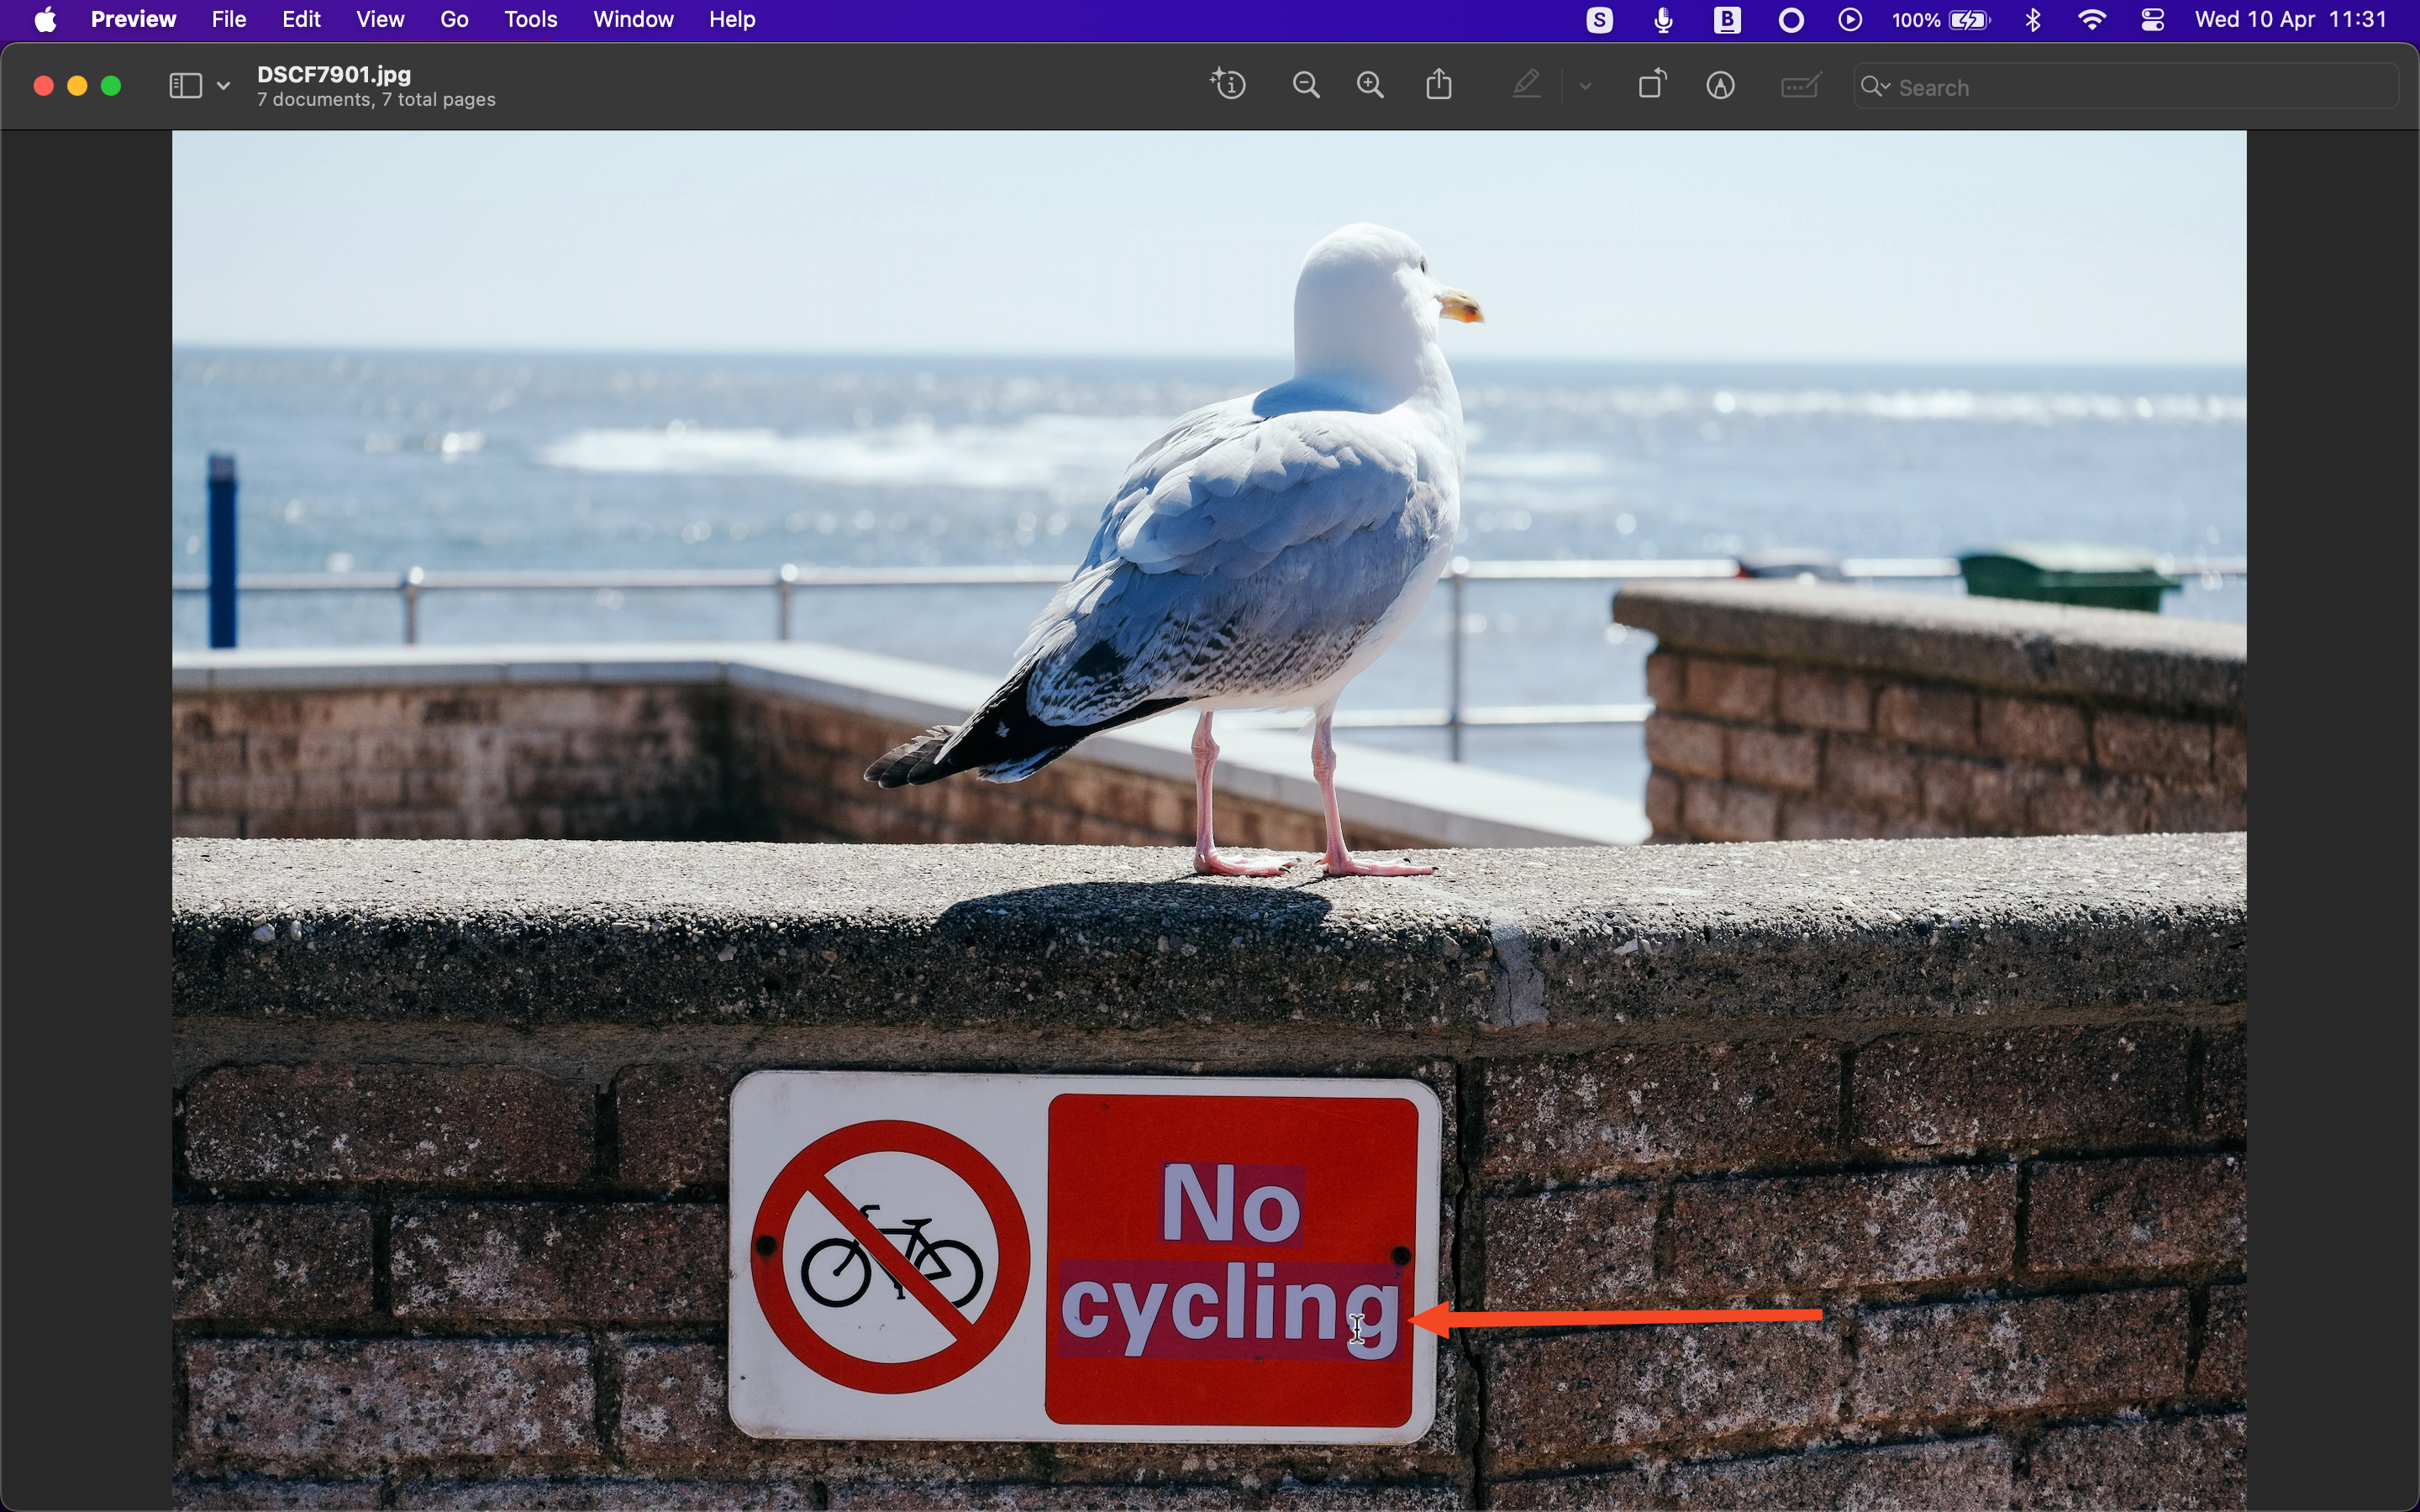
Preview has a built-in OCR feature that enables you to grab text, numbers, links, and numerous other things from photos.
Move your mouse pointer over some text in an image and it will turn into an I-Beam pointer, indicating that you can interact with the text below it.
Select the text and hit Command+C to copy it, for example, or if it’s a link, you can click on it to open it in your web browser.
Scan Documents
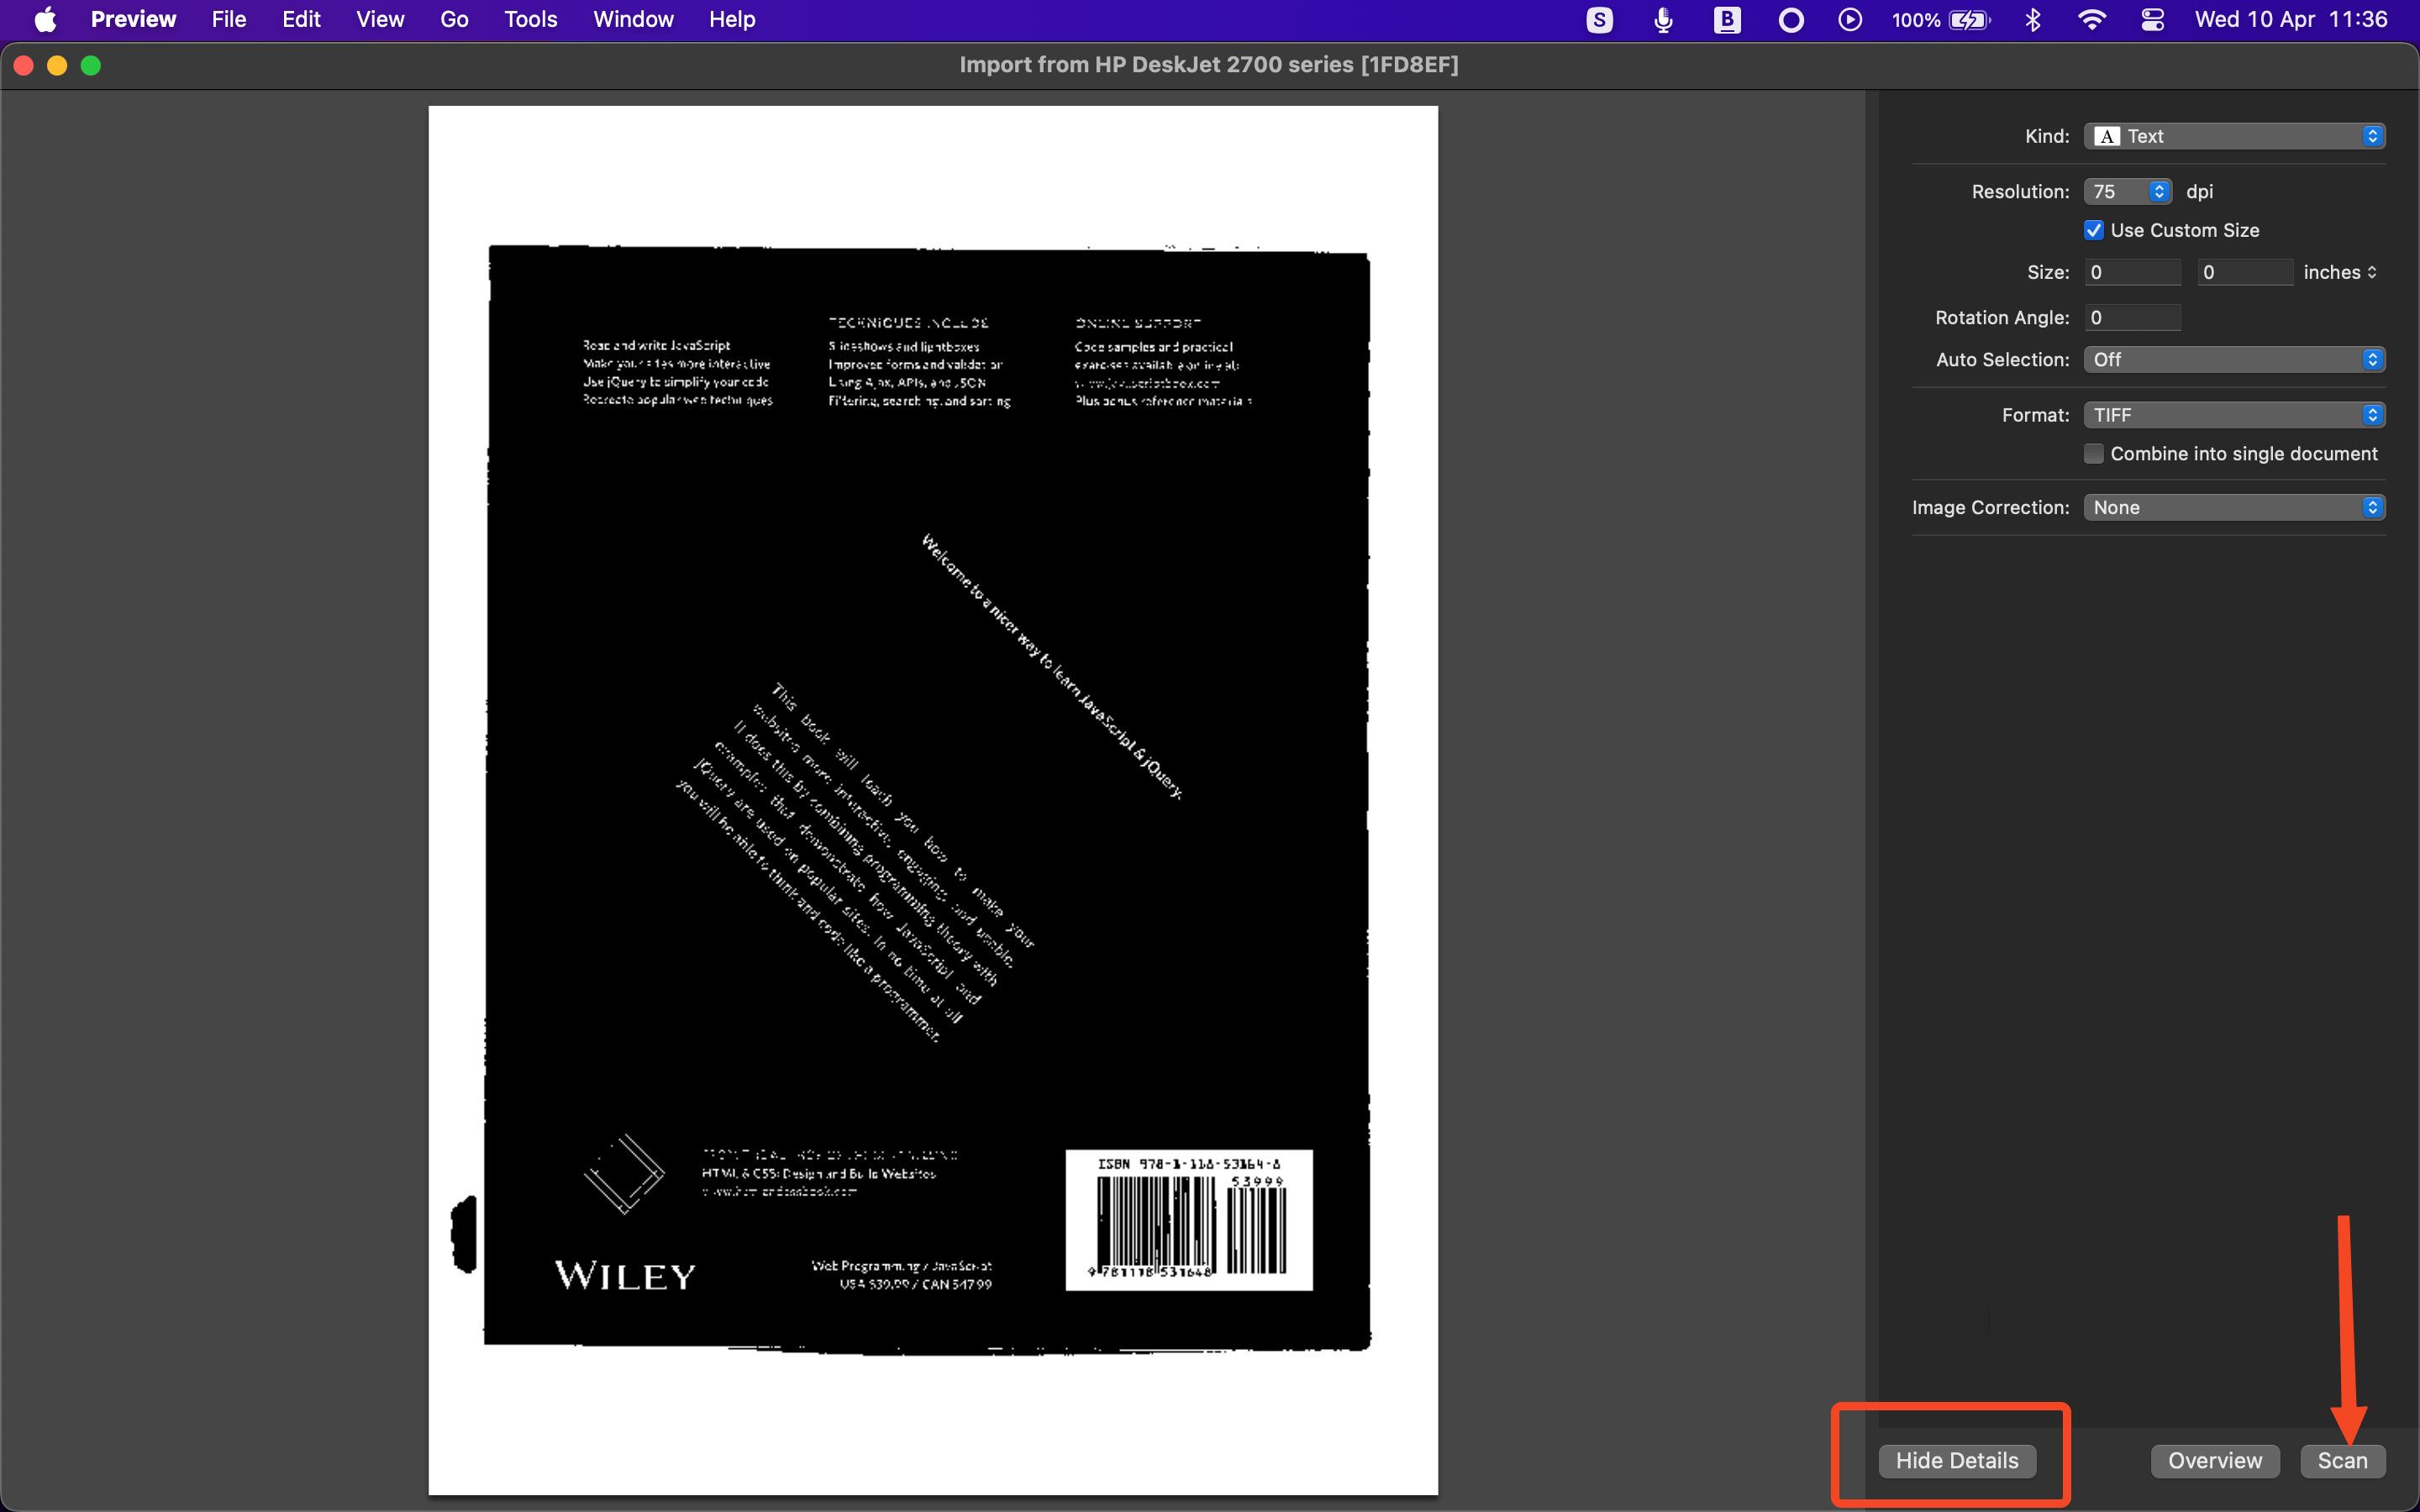
Setting up and using scanners can be a bit of a pain, but Preview makes it easy on a Mac. You don’t need any extra software to use your scanner with macOS—you can do it all in Preview.
If you have a scanner connected over Wi-Fi, just go to File > Import From and click the scanner name. Select “Show Details” to get a quick preview scan, then adjust any settings you need and click “Scan” to save the image.
Identify Objects in Photos
Another lesser-known feature in Preview is an object recognition tool. If the picture contains a particular object like a flower or an animal, Preview can automatically identify it and give you the ability to search for more information.
It doesn’t work in all images, but where it is available, the “Show the Inspector” icon in Preview’s toolbar will gain a few stars indicating it has AI features.

Click the button to show the inspector window and a small icon will appear in the image above the part that can be recognized. Click this to get more information on the object in your photo.
Close
Display Photos in a Slideshow
We’ve all got large numbers of photos that we never look at. Preview’s handy slideshow feature lets you quickly load them up and browse through them all. Just open a folder of images, go to View > Slideshow, then click the Play button to get started.

Create and Encrypt PDFs
Preview’s PDF support is a little more advanced than you might realize. You can save images, or documents from Pages and Numbers, as PDFs, and you can encrypt them so they’re only accessible with a password.
Go to File > Export as PDF. To encrypt the document and put other limitations on what people can do with it, click Show Details > Permissions. You can now add your password to the file and select other rules, such as preventing the file from being printed or stopping someone from copying text or extracting graphics.
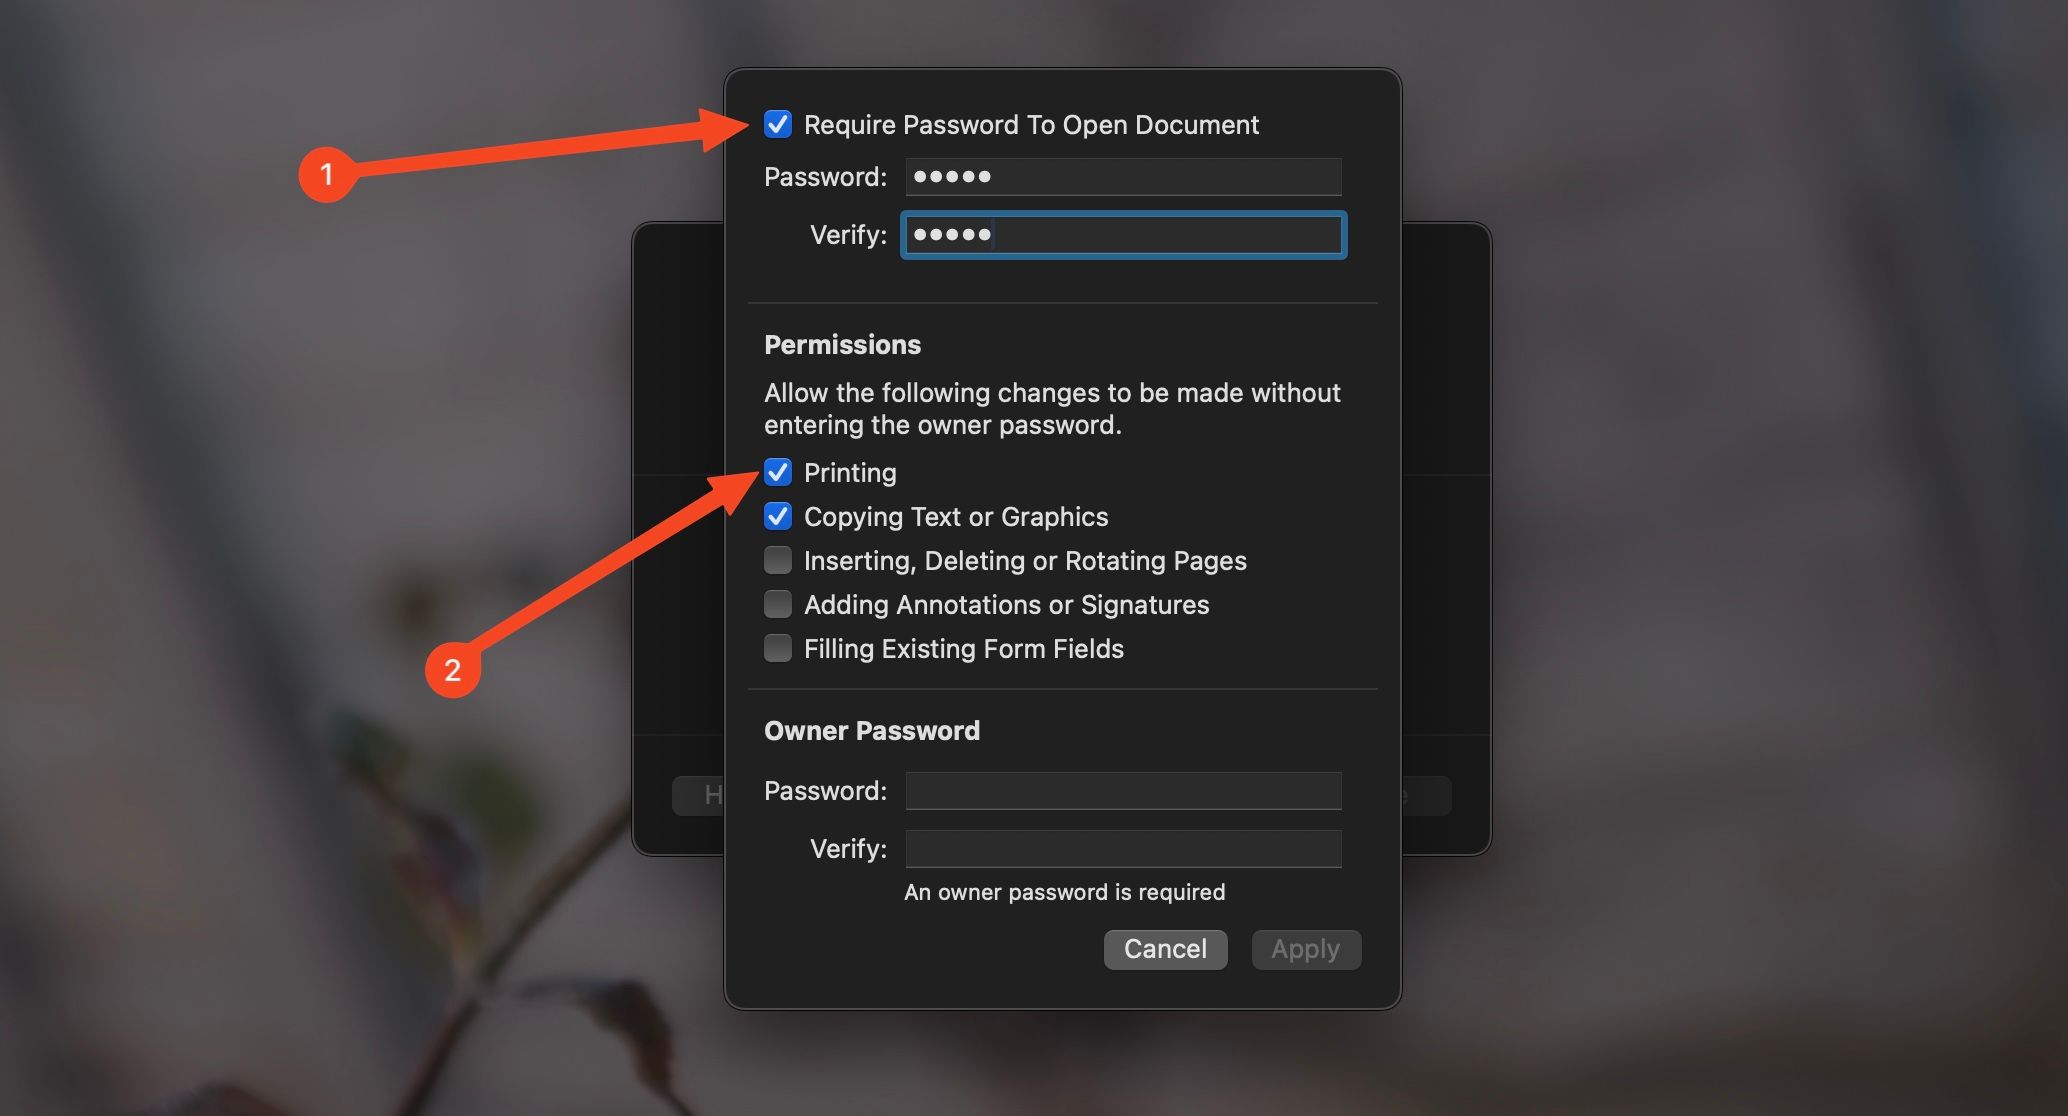
You can do this with existing PDFs, too. Open the PDF in Preview and go to File > Edit Permissions. Now you can add a password and change the other restrictions that were placed onto the file.
Edit PDFs
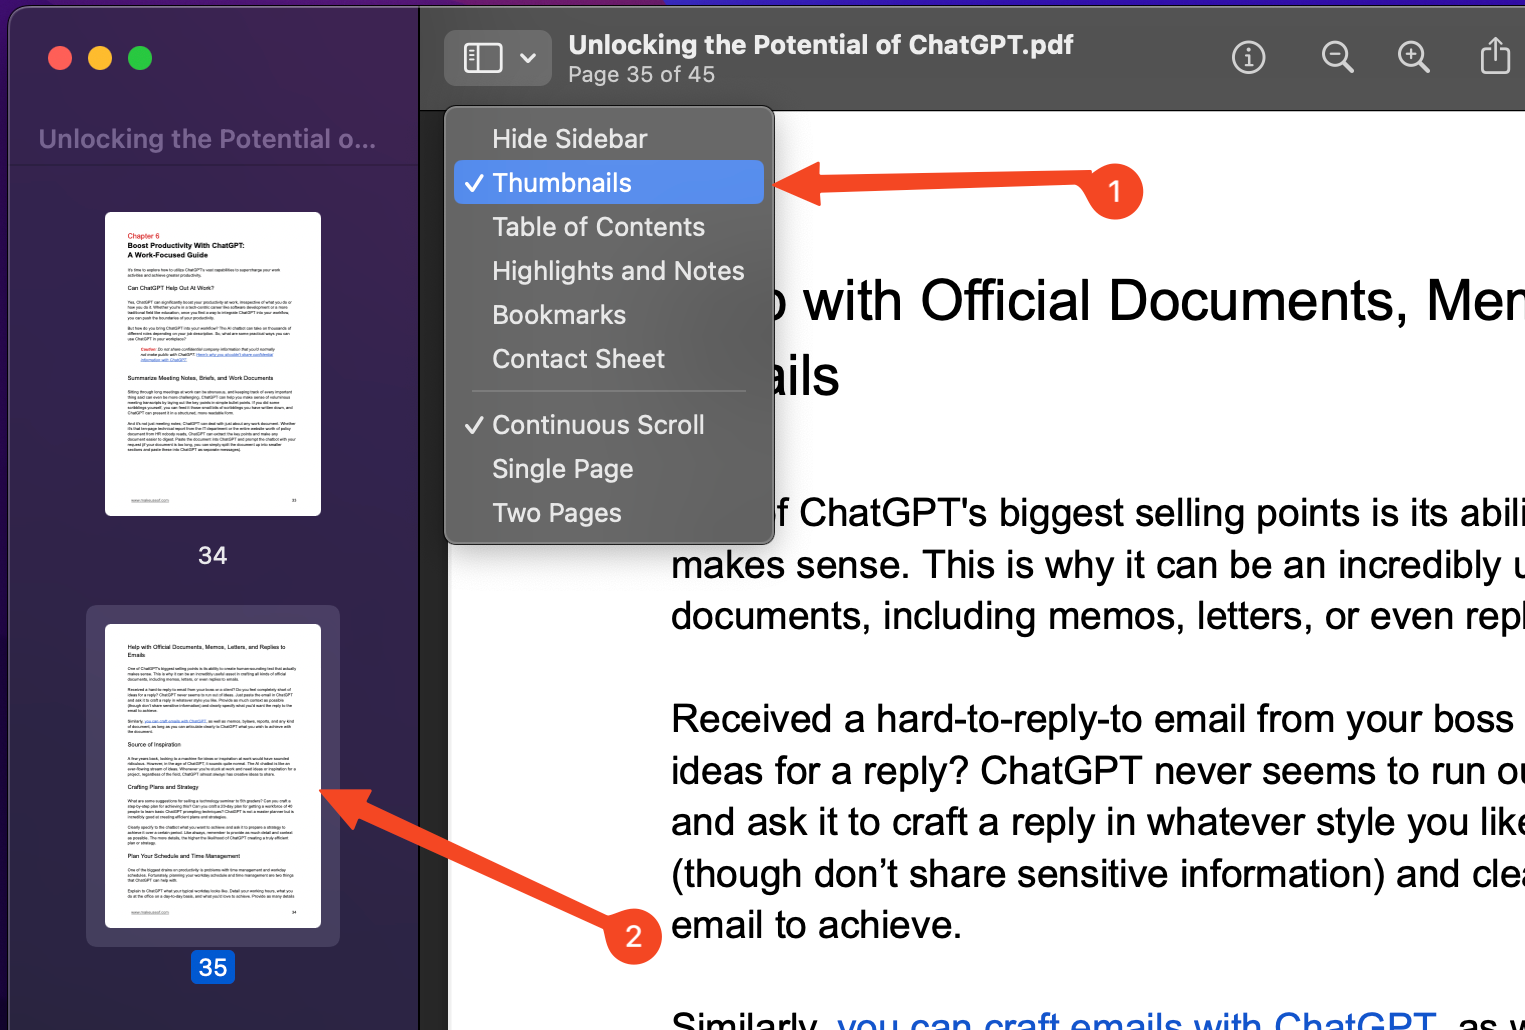
Preview also lets you carry out basic edits on PDFs. You can annotate them, redact sensitive information, add and remove pages, and digitally sign your documents.
To delete a page, click the “Choose Sidebar Display” icon in the top left and select “Thumbnails.” Then highlight the page or pages you want to delete and hit the Backspace key.
For further edits, click the “Show Markup Toolbar” button in the toolbar. Here, you have several tools for editing and annotating your PDFs.

To redact information from a file , click the Redact button and highlight the words, sentences, or paragraphs that you want to remove. Note that this is permanent and cannot be undone once you’ve saved your changes.

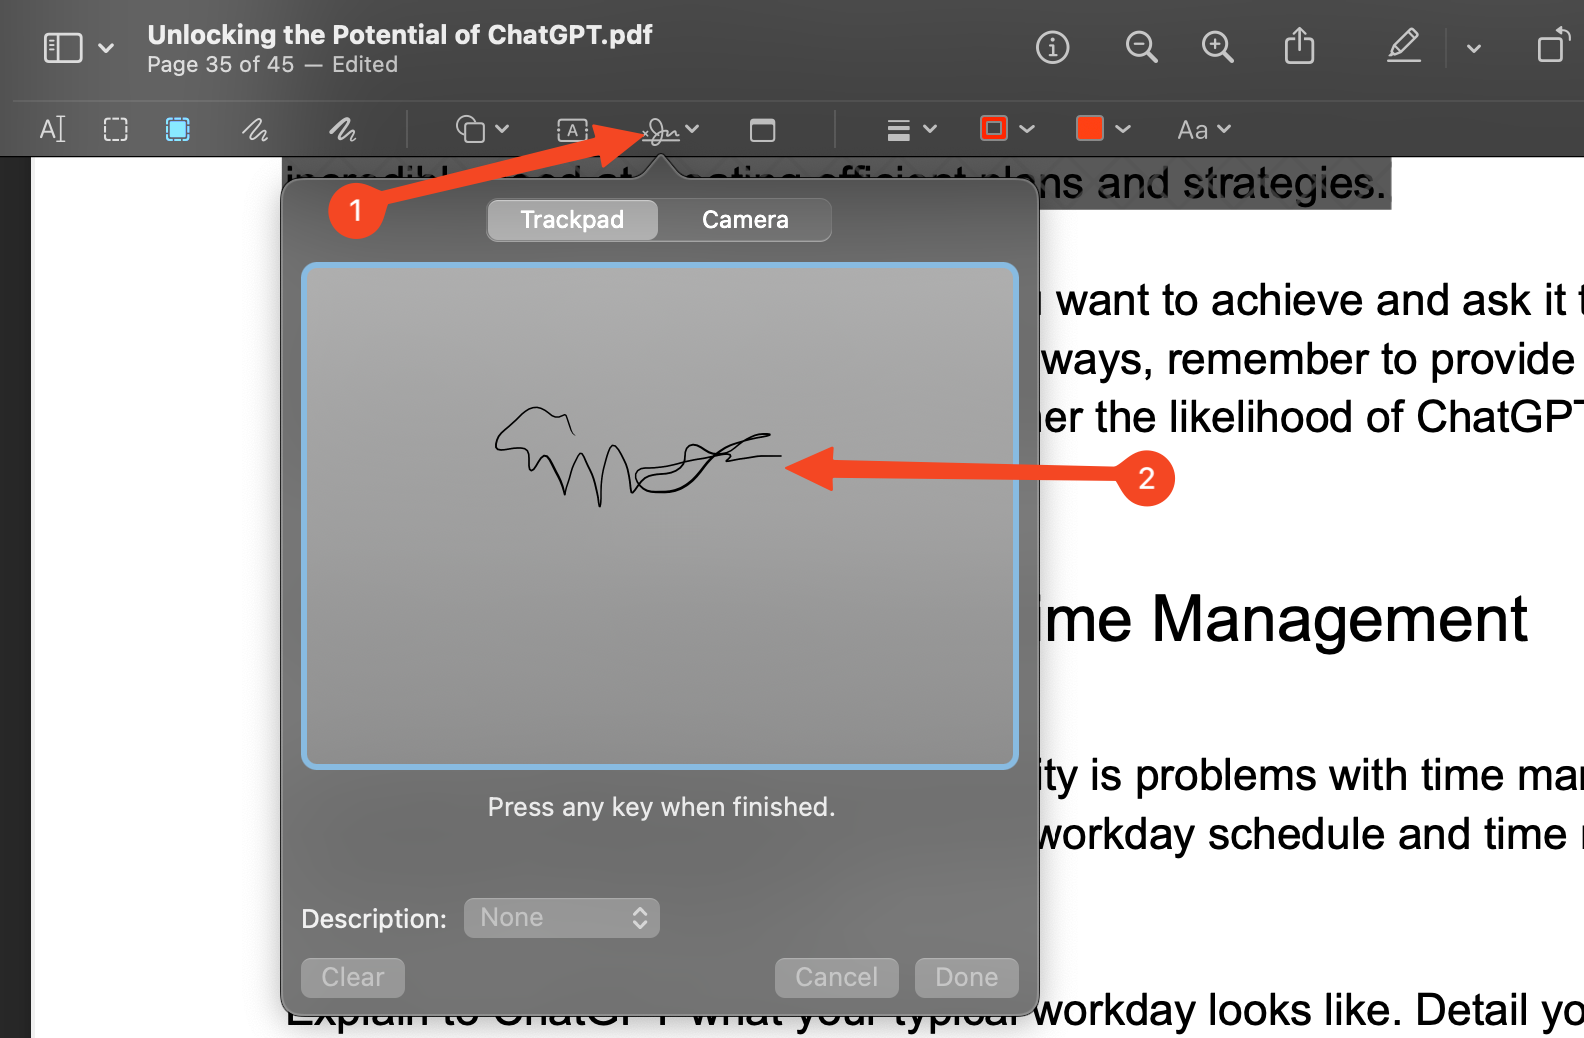
To sign a document , click the Sign button and create a signature either by drawing it with your mouse or trackpad, or by handwriting your signature onto a white piece of paper and holding it up to the camera. You can then drag it into a signature box on the PDF document to sign it.
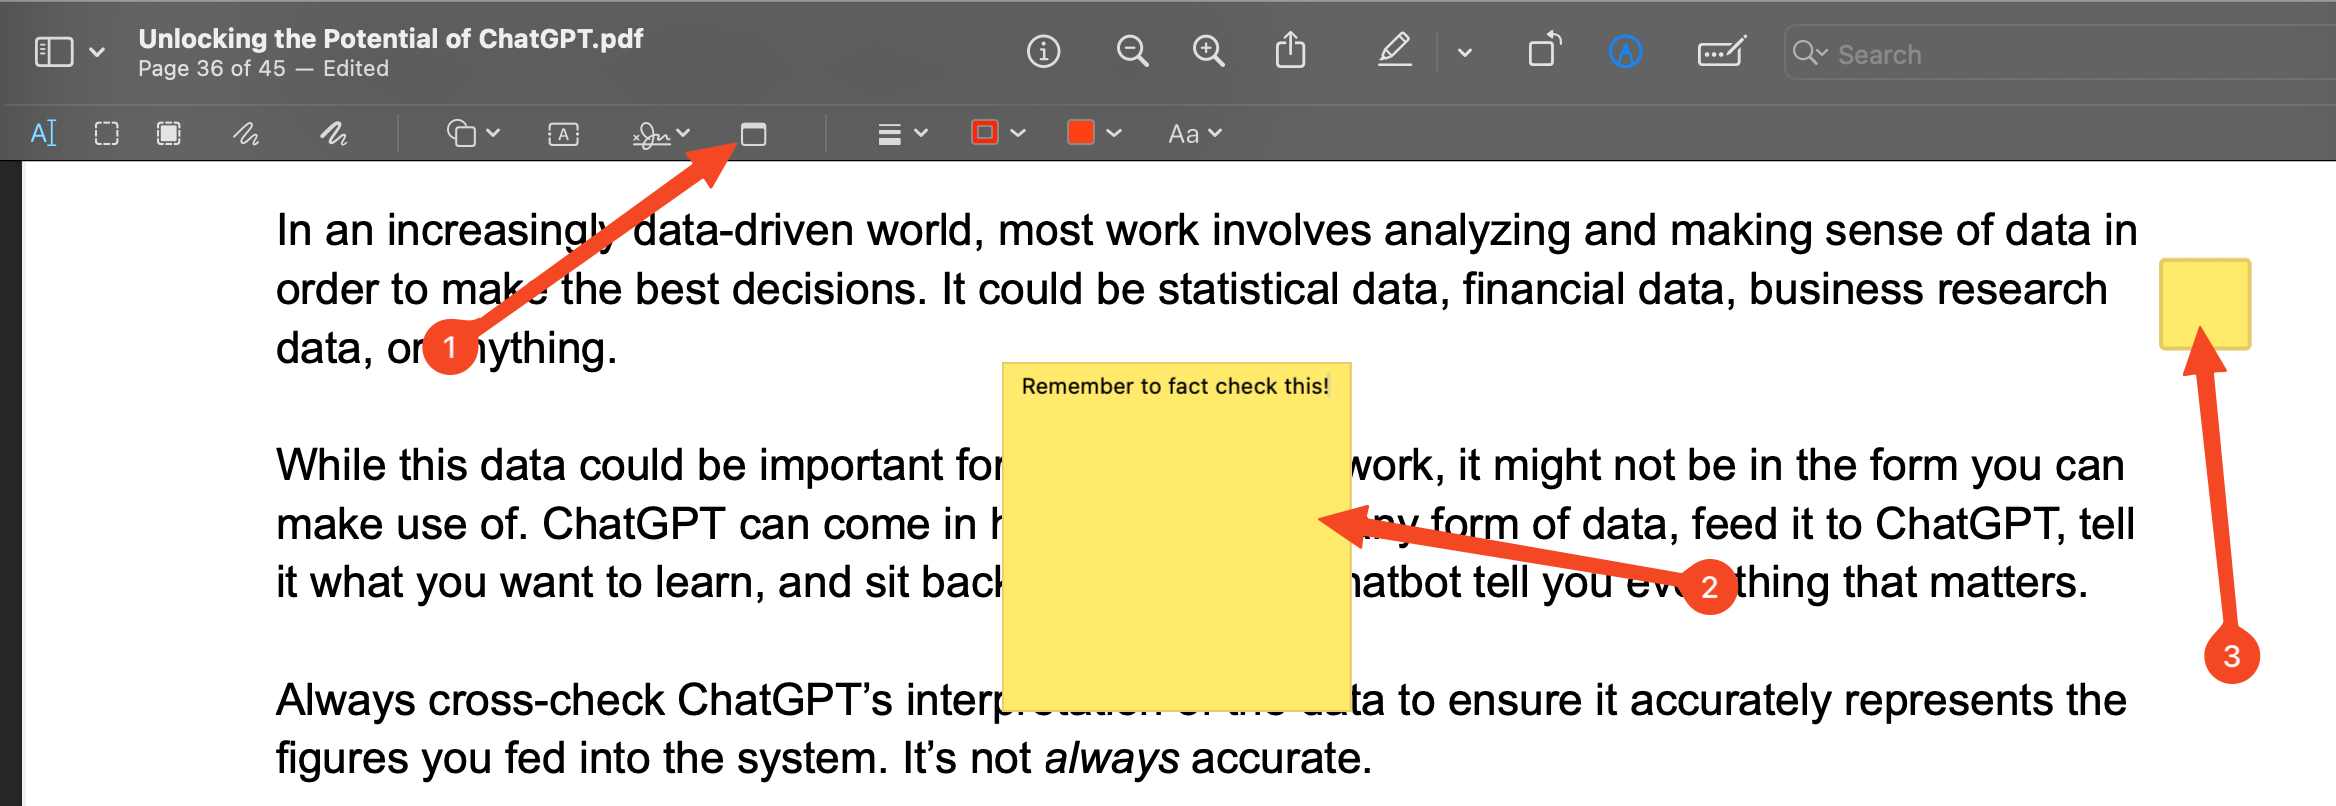
You can add a note to a document for comments, reminders about things to check, and so on. Click the Note button to do this. You can add multiple notes and drag them to any position on the document.
You can also annotate the PDF in the usual ways by drawing, adding text boxes, adding shapes, and so on.
Save Frames From GIFs
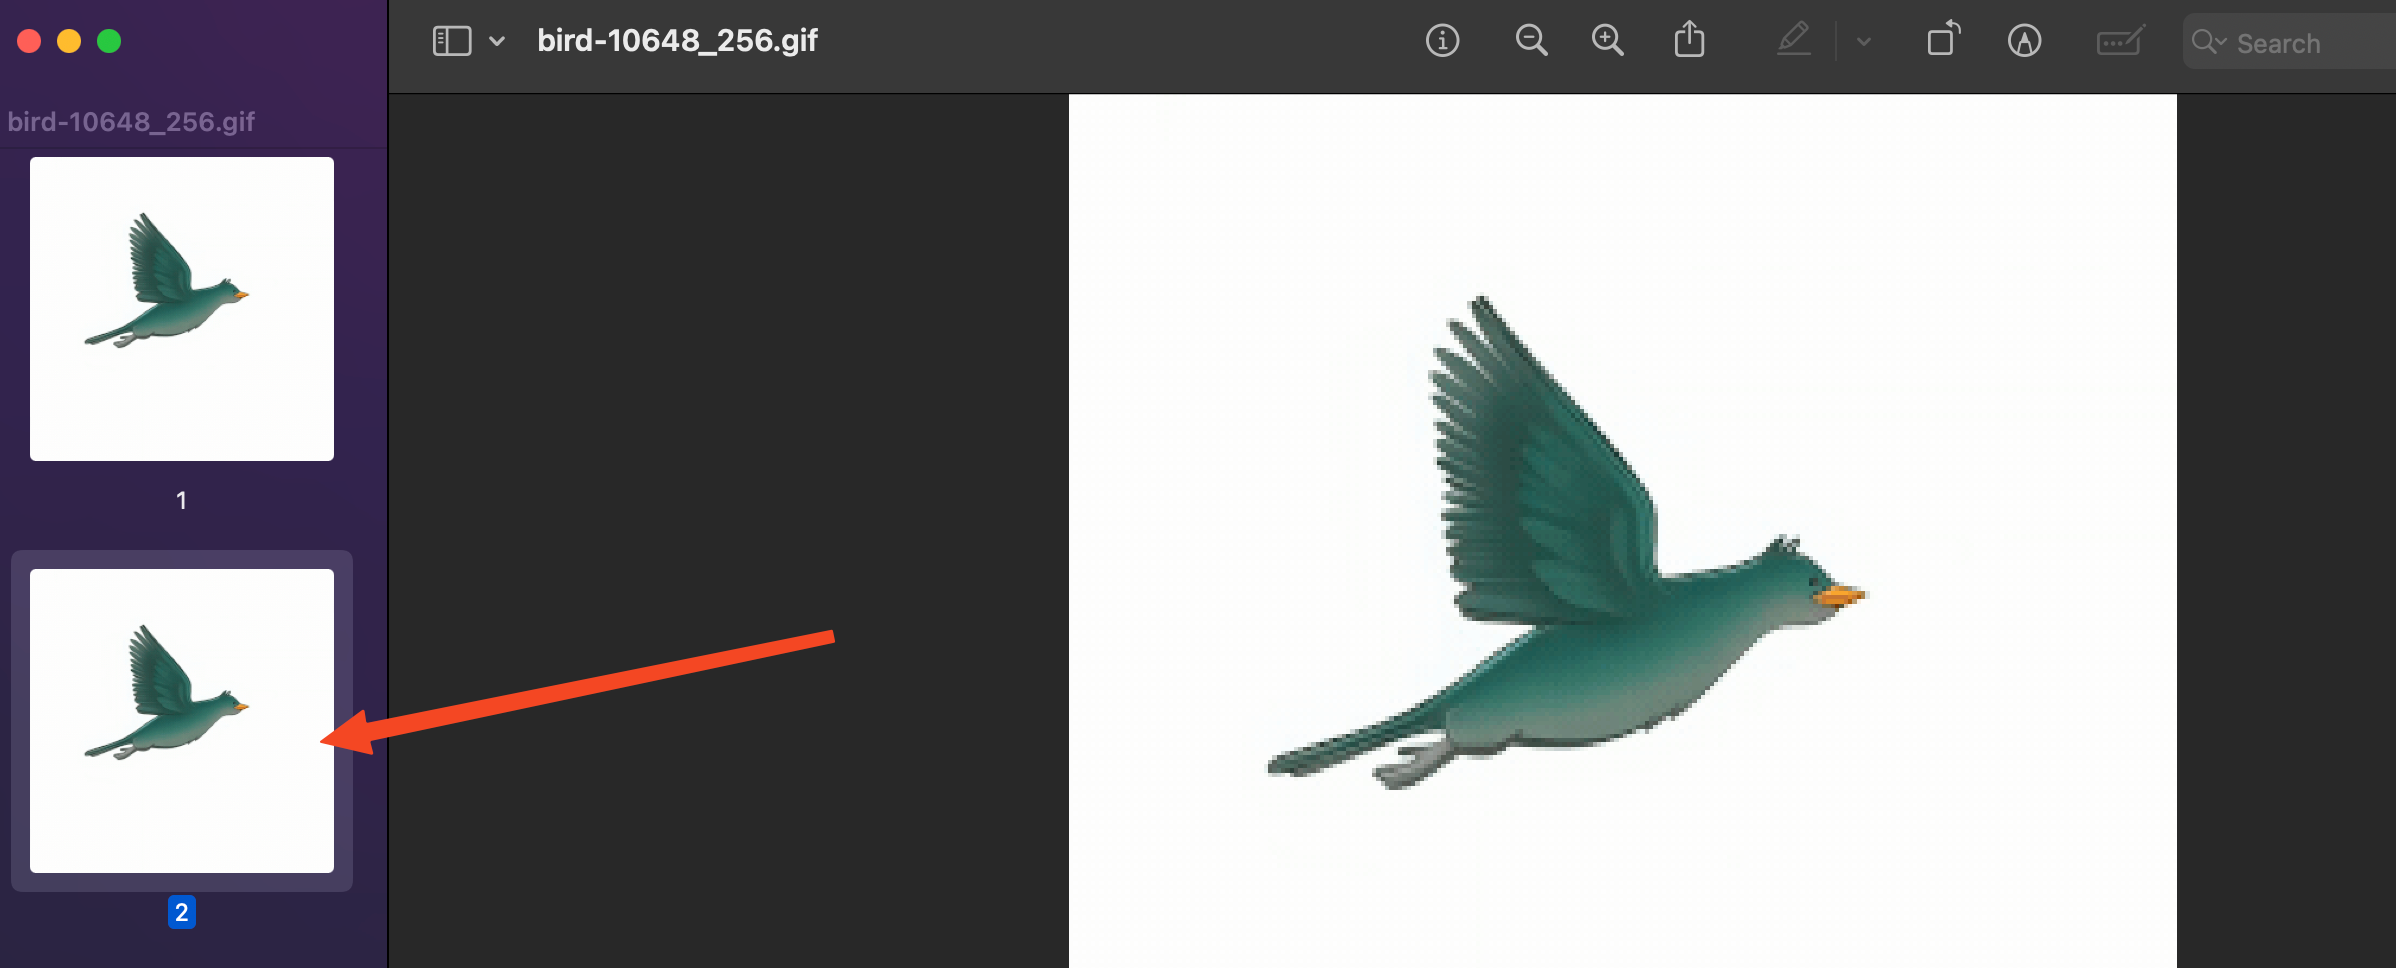
Ever need to save a single frame from a GIF? You can do that in Preview. Drag the GIF into Preview and you’ll see all of its frames in the sidebar. Locate the frame you want and then drag it to your desktop where it will be saved as a separate image file.
Batch Convert Images
Finally, if you’ve got many images that you need to convert from one file type to another, you can do it in one go in Preview.
Drag a folder of images onto the Preview icon in your Dock and make sure you can see them all as thumbnails in the sidebar.
Go to Edit > Select All, followed by File > Export Selected Images.
Choose the folder where you want to save your converted images, then click “Show Options” to select the file type and the compression level. Lastly, hit “Choose” and the process will begin.
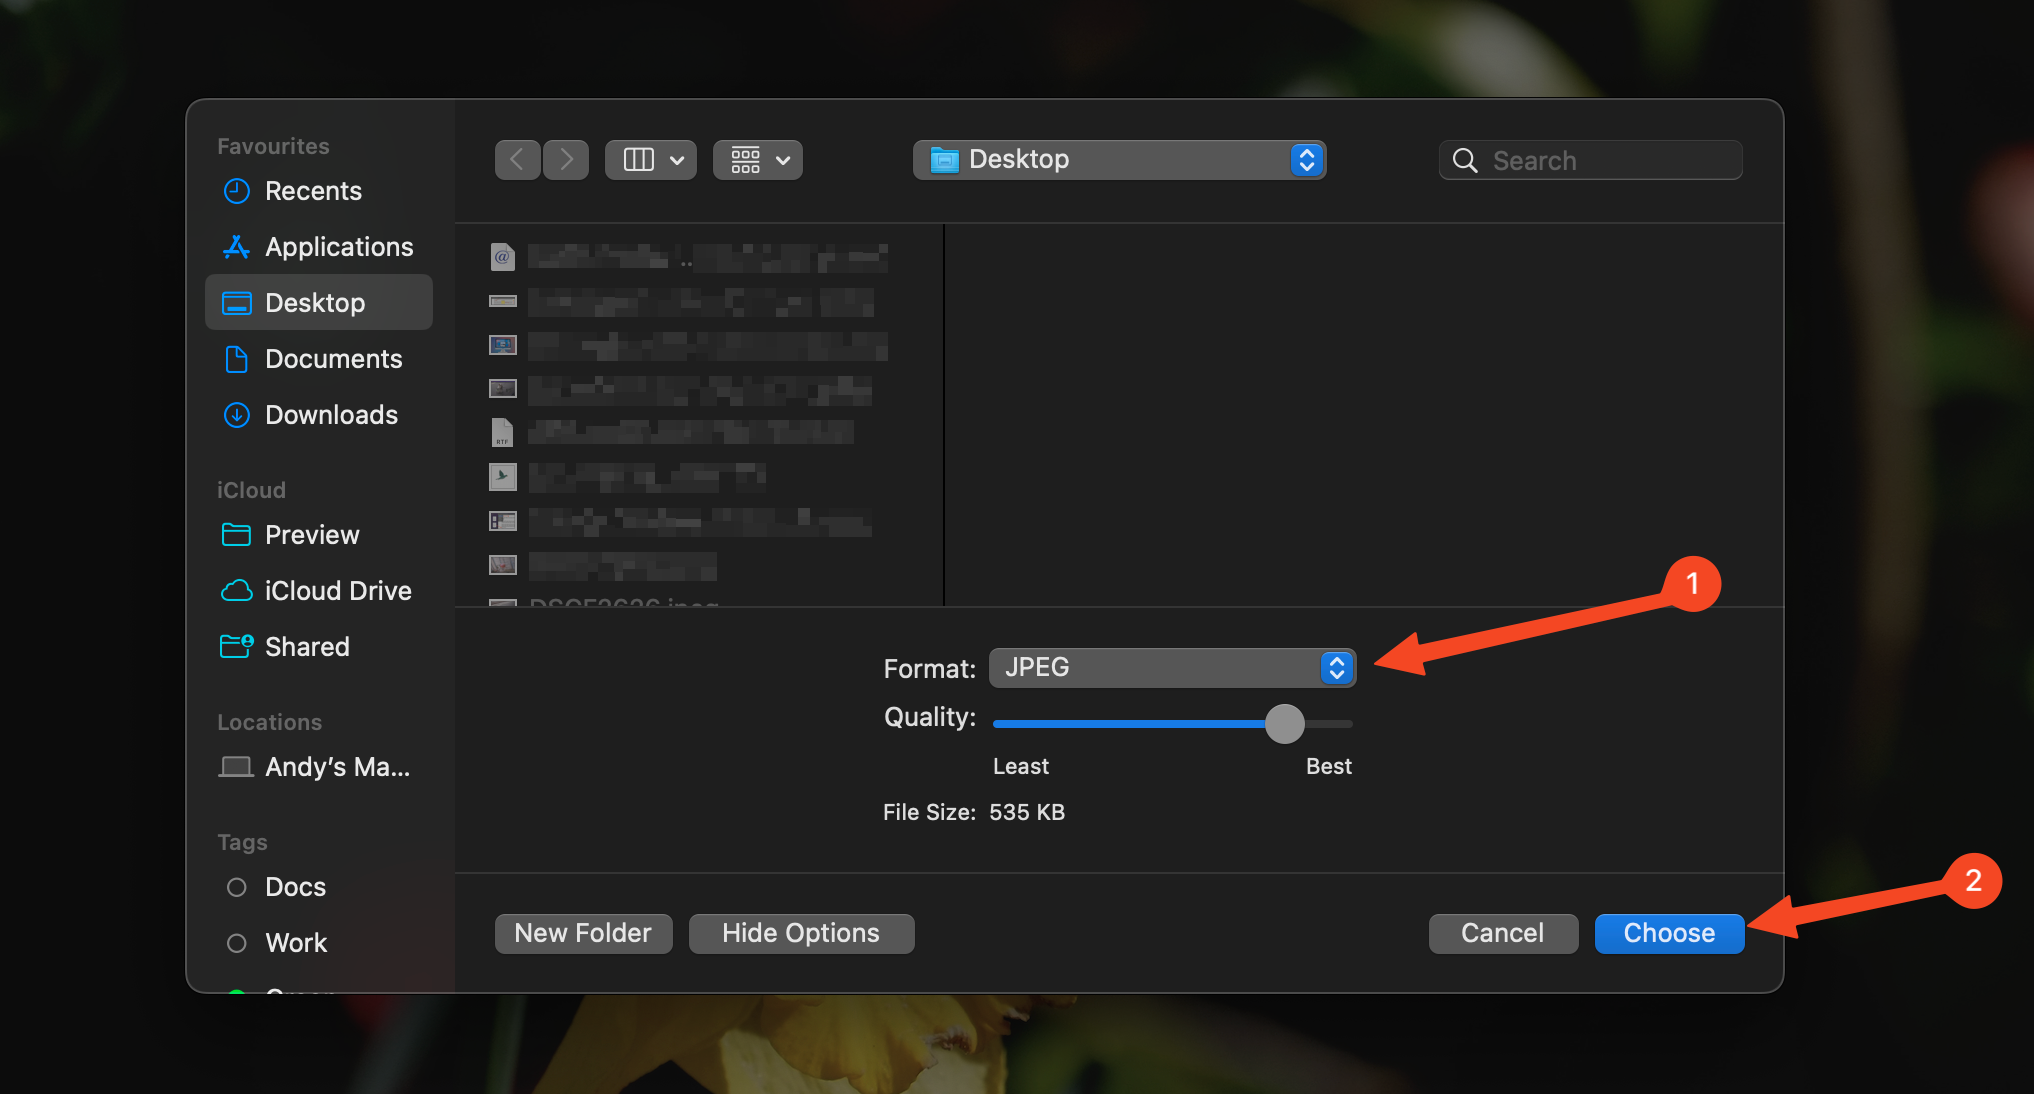
You can use this method to compress images in batches as well, just by converting them to the same file type but setting a higher compression level.
If you’re only using Preview as a basic image viewer, you’re missing out. It can do a lot more things than are immediately obvious, and can even replace the need for third-party apps and web services for common tasks like editing or converting images.
Also read:
- [Updated] Innovative Video Marketing YouTube Trailers with Filmora
- 2024 Approved Document Your Days with Xiaomi's State-of-the-Art Screenshot Tool
- 2024 Approved The Art of Soft-Ending Sounds in Premiere Pro
- 2024 Approved The Ultimate Guide to Professional Livestreamers VMix or Wirecast?
- In 2024, A Primer on Aerial Robots Drone Dynamics Demystified
- In 2024, Top Android Photo-Tech Tips & Apps Guide
- OBS Mastered Functioning Camera Now for 2024
- The Ultimate List: Top 10 ChatGPT Competing Platforms
- Top 17 Unbeatable Cyber Monday Offers: Discounted Televisions, Audio Equipment & More - Live Savings!
- Top 5 Budget-Friendly Camcorders with HD Quality for 2024
- Ultimate Platforms for Animated 3D Creation for 2024
- Title: 12 Surprising Tricks You Never Knew About Using Preview on Your Mac
- Author: Daniel
- Created at : 2025-03-03 23:32:03
- Updated at : 2025-03-05 22:18:50
- Link: https://some-skills.techidaily.com/12-surprising-tricks-you-never-knew-about-using-preview-on-your-mac/
- License: This work is licensed under CC BY-NC-SA 4.0.