
Disabling Microsoft Defender Antivirus in Windows 11: A Step-by-Step Guide

Disabling Microsoft Defender Antivirus in Windows 11: A Step-by-Step Guide
Quick Links
- When Should You Permanently Disable Microsoft Defender Antivirus
- Turn Off Real-Time Protection and Tamper Protection in the Windows Security App
- Disable Microsoft Defender Using the Registry Editor
- Disable Microsoft Defender Using the Local Group Policy Editor
- How to Check the State of Microsoft Defender on Windows 11
Key Takeaways
- If you want to permanently disable Microsoft Defender on Windows 11, you’ll first need to disable Real-time protection and Tamper protection in the Windows Security app.
- Windows Home users can use the Registry Editor to turn off Microsoft Defender. Windows Pro users have the option to do it through either the Registry Editor or the Local Group Policy Editor.
- You can determine whether Microsoft Defender is currently disabled by running the “Get-MpComputerStatus | select AMRunningMode” command in Windows PowerShell.
Windows built-in security app, Microsoft Defender, protects your computer from malicious agents and viruses. However, there may be situations when you want to disable it, such as when testing a third-party security app. We’ll show you how to permanently disable Microsoft Defender on Windows 11.
When Should You Permanently Disable Microsoft Defender Antivirus
Microsoft Defender Antivirus provides various protection features, including real-time protection, cloud-delivered protection, network protection, and more. When you disable Microsoft Defender, you lose access to all these protections, leaving your computer at risk.
Generally, you should avoid disabling Microsoft Defender Antivirus. However, if the need arises—for example, when you need to install an application that Defender is blocking—you can temporarily turn it off . To do so, turn off Real-time protection in the Windows Security app, install the application, and then re-enable Real-time protection.
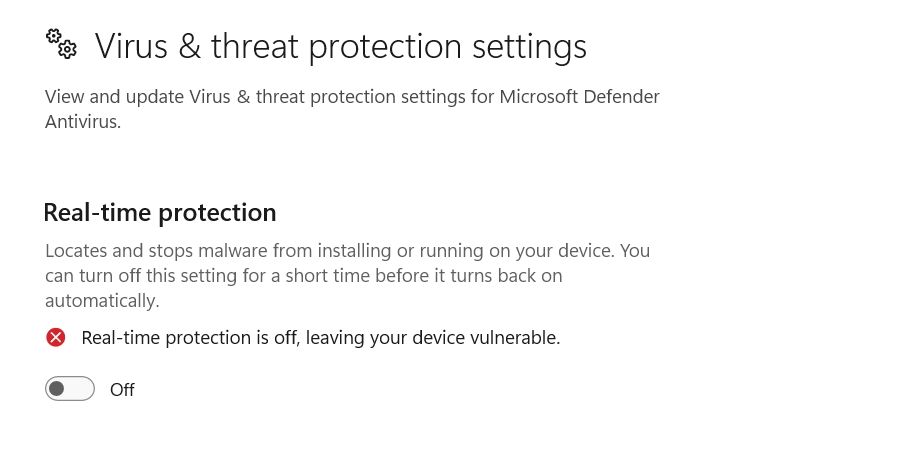
Additionally, if you intend to permanently disable Defender Antivirus to install a third-party security application, you must reconsider your choice. This is because when you install a compatible non-Microsoft antivirus program , Microsoft Defender antivirus will automatically disable itself. Compatible non-Microsoft antivirus programs are those that do not cause any issues when installed alongside Windows Defender.
Luckily, there are numerous antivirus programs that are compatible with Microsoft. To verify compatibility, you should check the antivirus program’s user manual or inquire with the seller.
However, if you wish to install a security program that is not compatible with Microsoft, you will need to disable Microsoft Defender Antivirus permanently.
Now that you know when you should and should not permanently disable Microsoft Defender, let’s check out how you can permanently disable Microsoft Defender on Windows 11.
Turn Off Real-Time Protection and Tamper Protection in the Windows Security App
Unlike temporarily disabling Microsoft Defender Antivirus, permanently disabling it isn’t straightforward. First, you’ll need to disable Real-time and Tamper Protection in the Windows Security app.
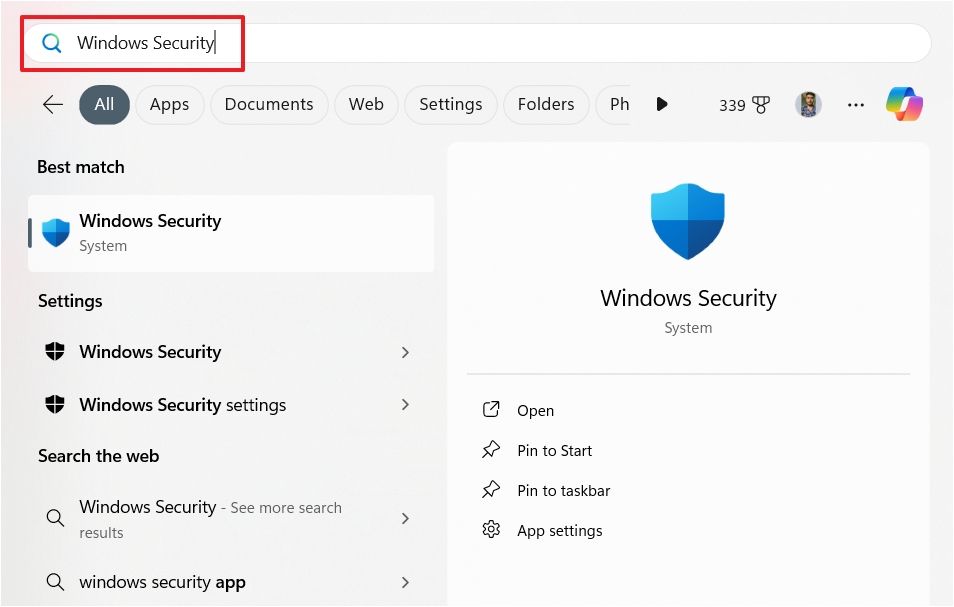
Disabling Real-time protection ensures that Microsoft Defender won’t scan any files on your computer. And disabling Tamper Protection allows you to make changes to the Microsoft Defender antivirus settings on your computer, which otherwise wouldn’t be possible. To turn off these settings, open the Start menu, type Windows Security in the search bar, and hit Enter.
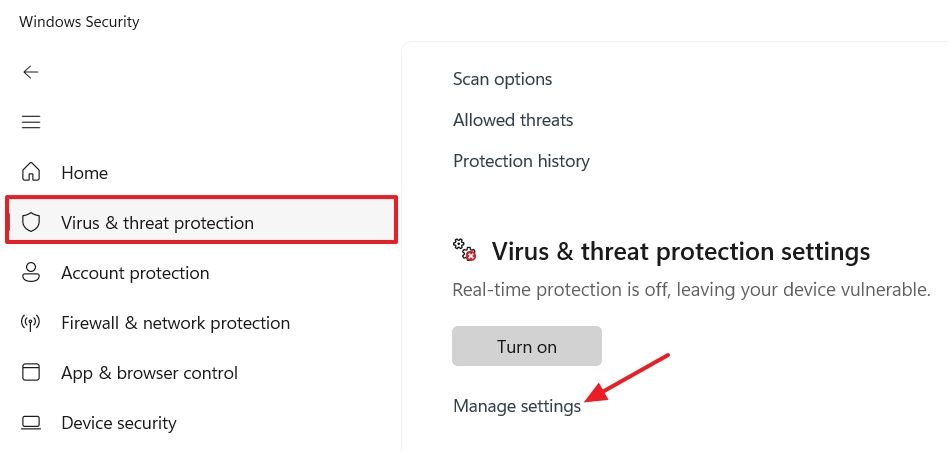
Choose “Virus & Threat Protection” from the left sidebar, then click “Manage Settings” on the right.
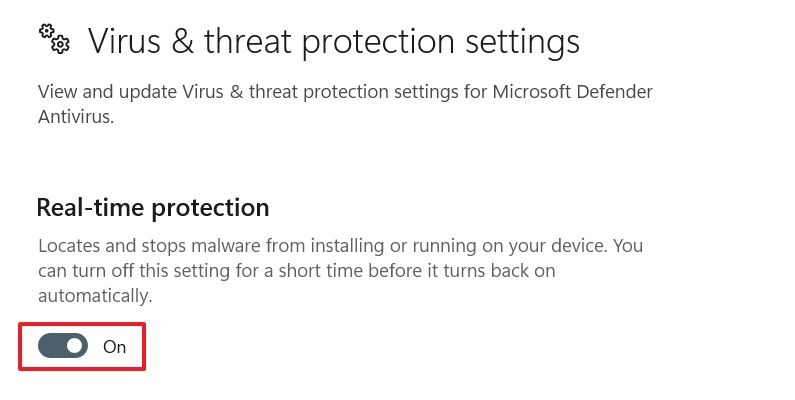
Turn off the “Real-Time Protection” toggle. If UAC pops up, click “Yes” to confirm your decision.
Next, disable the “Tamper Protection” toggle. Click “Yes” when the UAC prompt appears.
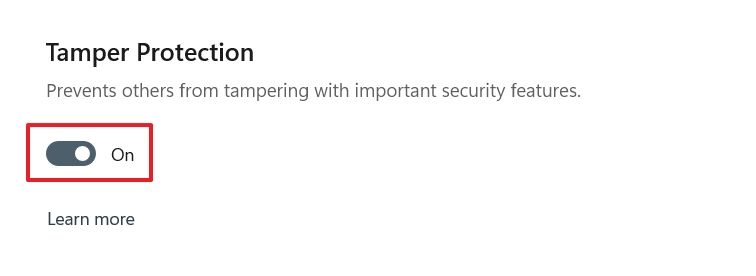
Once you’ve adjusted these settings in the Windows Security app, you’re all set to disable Microsoft Defender Antivirus on Windows 11 permanently.
Disable Microsoft Defender Using the Registry Editor
If you have Windows 11 Home installed on your computer, you can use the Registry Editor to disable Microsoft Defender permanently.
Editing the registry is risky, as one wrong move can make your system unstable. As a precautionary measure, be sure to back up the registry and create a restore point . This way, you can restore your computer to a working state in case something goes wrong.
Open the Start menu, type Registry Editor in the search bar, and hit Enter. Then, in the Registry Editor, navigate to the following path:
`Computer\HKEY_LOCAL_MACHINE\SOFTWARE\Policies\Microsoft\Windows Defender`
Right-click the “Windows Defender” key in the left sidebar, hover over “New,” and choose “DWORD (32-bit) Value”.
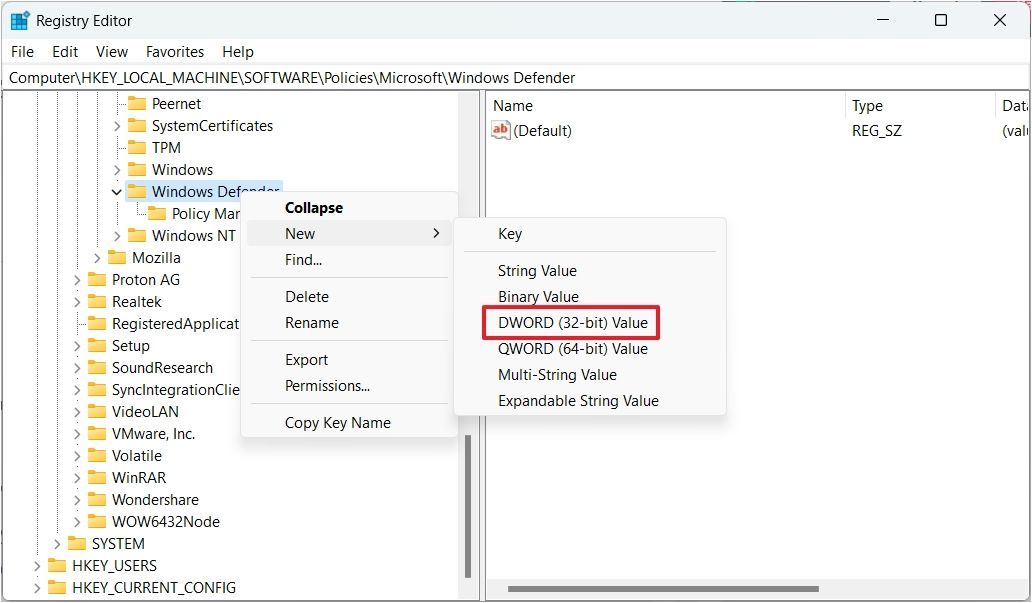
Name the value “DisableAntiSpyware.” Then, double-click the “DisableAntiSpyware” value, type 1 in the “Value Data” field, and click “OK.”
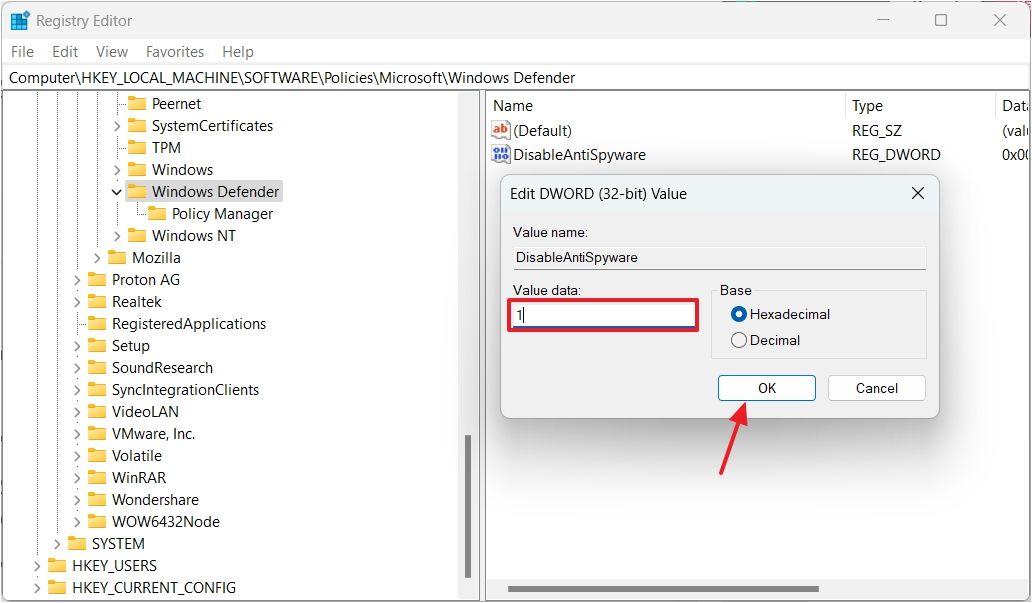
After that, restart your computer for the changes to take effect. Upon restart, you’ll see that Microsoft Defender has been permanently disabled on your computer.
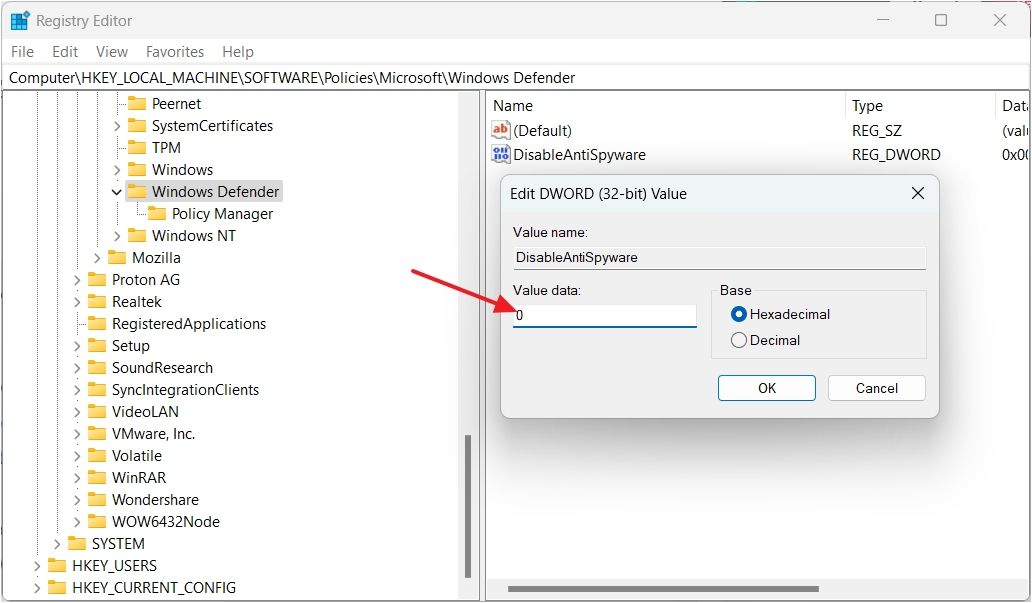
To reenable Microsoft Defender Antivirus, type 0 in the “Value Data” field of the “DisableAntiSpyware” value and click “OK.” Afterward, you’ll need to enable “Real-time Protection” and “Tamper Protection” in the Windows Security app, too.
Disable Microsoft Defender Using the Local Group Policy Editor
If you are a Windows 11 Pro user, you have an additional option to permanently disable Microsoft Defender. While you can use the Registry Editor for this process, as a Pro user, you also have the option to use Local Group Policy Editor.
Press Win+R to open the Run tool. Then, type gpedit.msc in the search field and click “OK.”
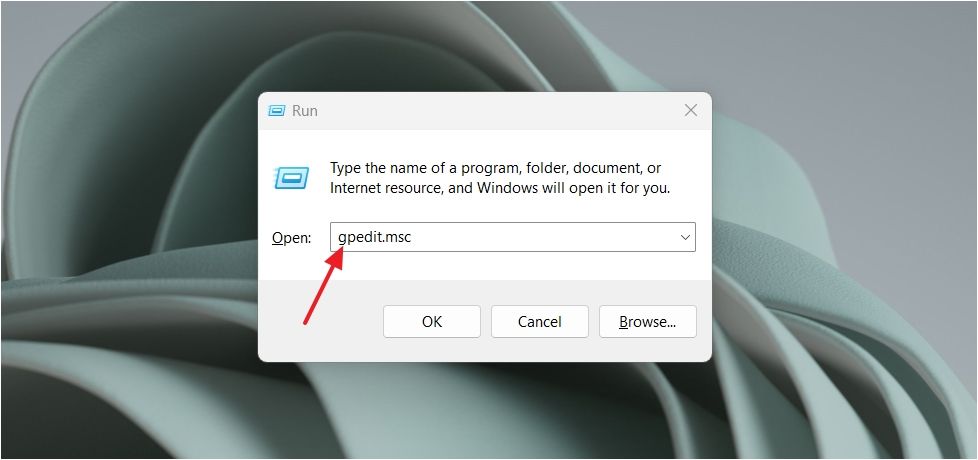
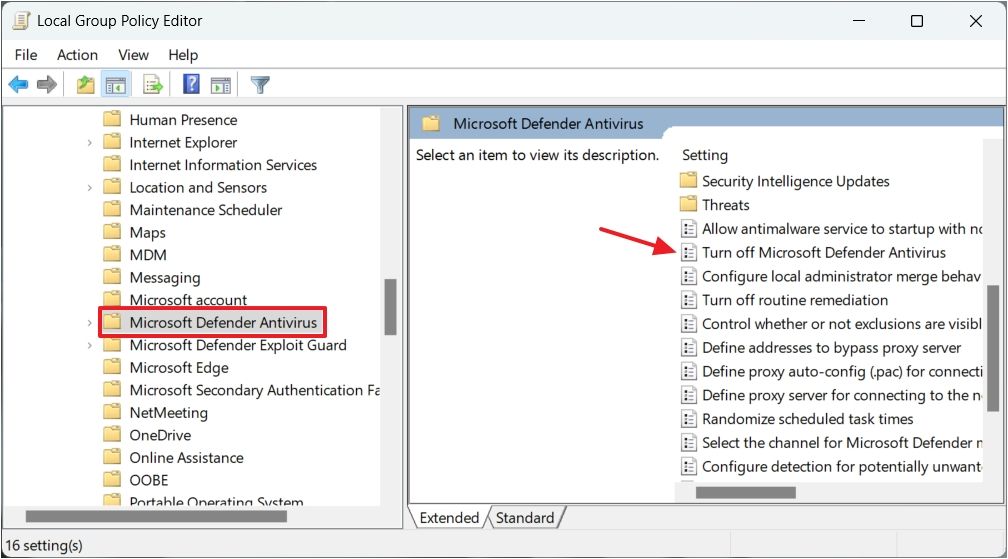
In the Local Group Policy Editor window, navigate to the following location:
`Computer Configuration > Administrative Templates > Windows Components > Microsoft Defender Antivirus`
Double-click the “Turn Off Microsoft Defender Antivirus” policy.
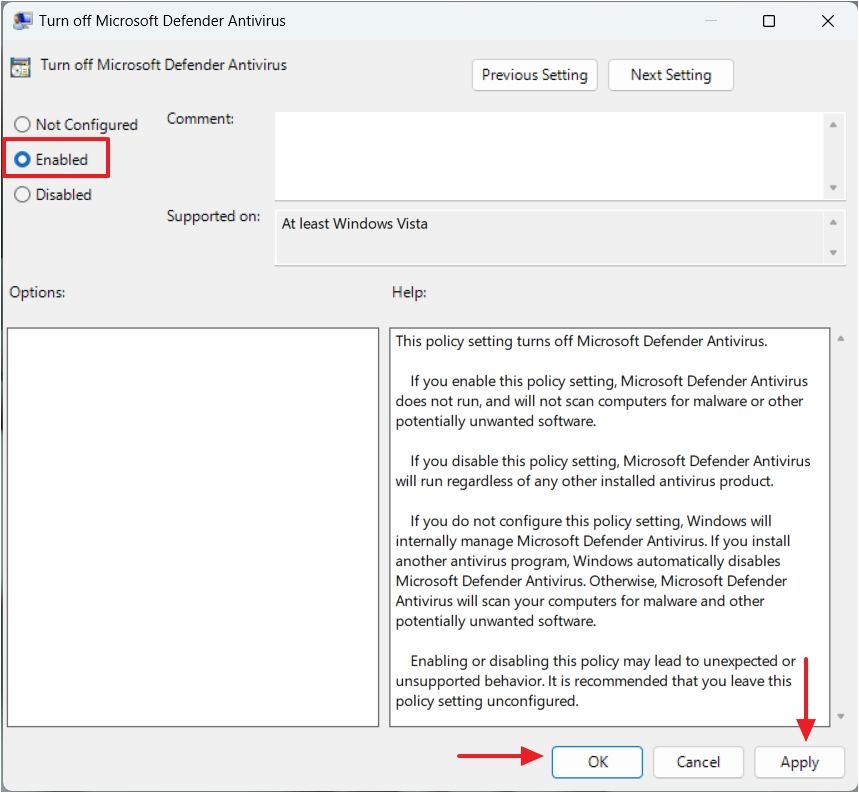
In the Edit window, choose “Enabled.” Then, click “Apply” and “OK” to save the changes.
That’s it! Restart your computer, and you’ll see that Microsoft Defender is disabled.
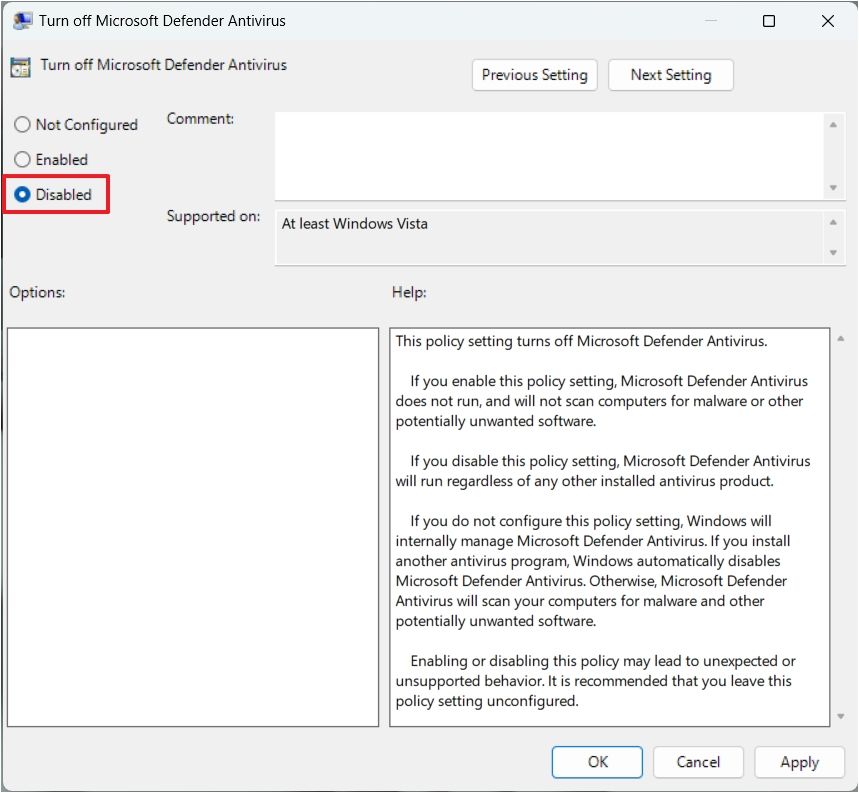
If you want to enable Microsoft Defender in the future, set the “Turn Off Microsoft Defender Antivirus” policy to “Disable.” After that, turn on the “Real-time Protection” and “Tamper Protection” toggles in the Windows Security app.”
How to Check the State of Microsoft Defender on Windows 11
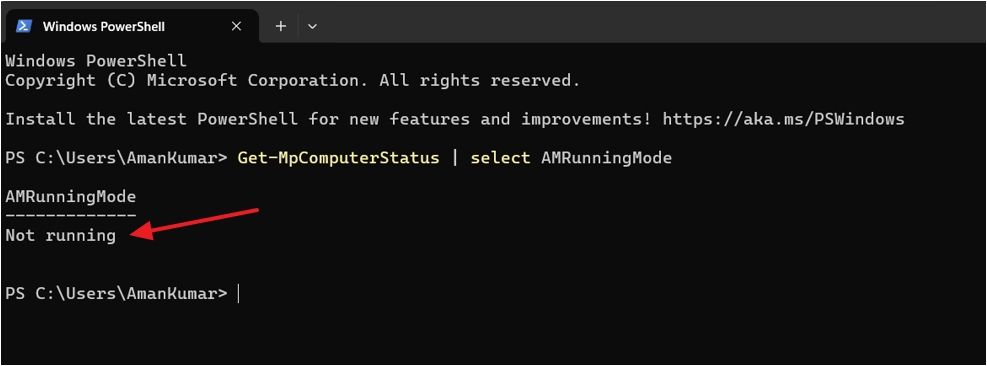
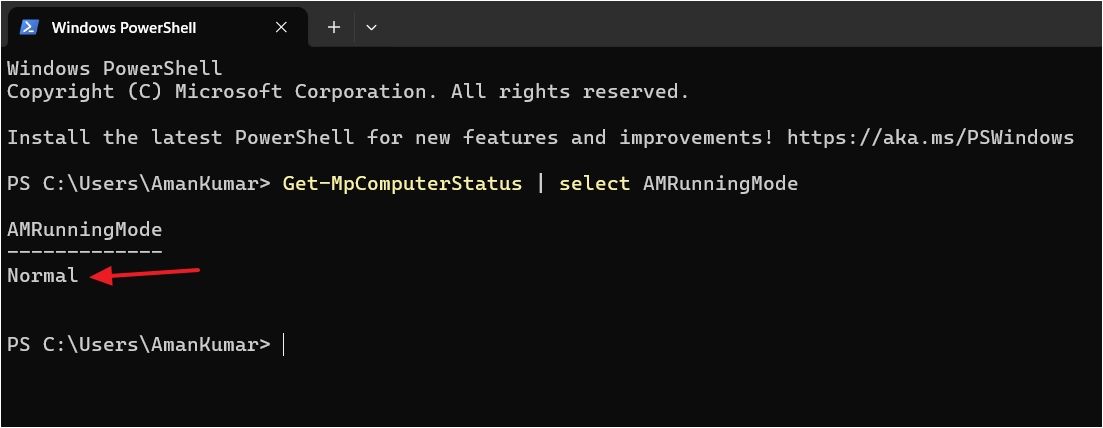
Once you’ve disabled Microsoft Defender using the above method, you must check its state to confirm if it has actually been disabled. To do this, open the Start menu, type PowerShell in the search bar, and press Enter. Then, in the PowerShell window, type the following command and hit Enter:
`Get-MpComputerStatus | select AMRunningMode`
If you get “Not Running” as the result, then it confirms that you have disabled Microsoft Defender.
However, if you get “Normal” as the result, it means Microsoft Defender is still running on your computer. In this case, double-check that you followed the steps correctly.
Microsoft opted for the longer process to permanently disable Microsoft Defender instead of providing a one-click button to ensure computer safety. Even though it might be tempting, you really should disable it unless you absolutely need to.
Also read:
- [New] 2024 Approved Igniting Instagram Interest Maximizing Content Reach and Interactions
- [New] In 2024, The Milestones of VegasPro's 2019 Upgrade
- [New] Premier 10 Layouts AE Text Edition for 2024
- [New] StopCapture Screen Freeze Assist
- [Updated] 2024 Approved From Video Content to Cash Flow YouTube's Profit Mechanics
- [Updated] 2024 Approved Swiftly Move Data Fast and Reliable Methods to Direct Files Onto Your Computer
- [Updated] Exploring UAVs' Operation A Guide to Aerial Robotics
- [Updated] Toolwiz Evaluation The Top Choice in Mobile Editing?
- 2024 Approved The Ultimate Guide to VR Fitness Treadmills
- 2024 Approved Understanding Quantum HDR's Impact on Photography
- 2024 Approved Unlocking Potential The Best 6 for NFT Artistry
- 2024 Approved Utilizing B-Roll to Enrich Narrative Arcs
- In 2024, Top 4 Ways to Trace Vivo V30 Location | Dr.fone
- Techniques to Deactivate Auto-Played Podcast Suggestions in Spotify for 2024
- Top Entry Editor for Seamless Edits Across All Platforms for 2024
- Unveiling the Reasons Behind the Move to Electric Vehicles
- Title: Disabling Microsoft Defender Antivirus in Windows 11: A Step-by-Step Guide
- Author: Daniel
- Created at : 2025-02-28 18:17:52
- Updated at : 2025-03-05 17:40:41
- Link: https://some-skills.techidaily.com/disabling-microsoft-defender-antivirus-in-windows-11-a-step-by-step-guide/
- License: This work is licensed under CC BY-NC-SA 4.0.