
"In 2024, Uncluttered Focus Affinity Photo's Cleanup Technique"
Uncluttered Focus: Affinity Photo’s Cleanup Technique
Affinity Photo is an image editor developed by Serif Ltd. in 2009 and is used by professional graphic designers and content editors. It makes the content editing process a hassle-free, creative, and enjoyable activity. Also, beginners and amateur content editors can easily use Affinity Photo.
No matter you are a professional content creator or a newbie, we’ll be discussing how to remove background in Affinity Photo. Let’s explore how to use the good editing tool to be free of the stressful editing process.
How to Remove Affinity Photo to Remove Image’s Background
Affinity Photo is a simple and easy-to-use editing software, and you can remove a background in it under two scenarios: remove a white or a busy background.
How to Erase a White Background in Affinity Designer
To erase a white background in Affinity Designer, do these steps:
Step1 In the first step, install the Affinity Designer software and launch it on your computer. Go to “File” > “Open” and head to the location of your image with a white background on your drive to import it.
Now access the Pixel Persona section in the left corner of the software screen by clicking the colored boxes icon.
![]()

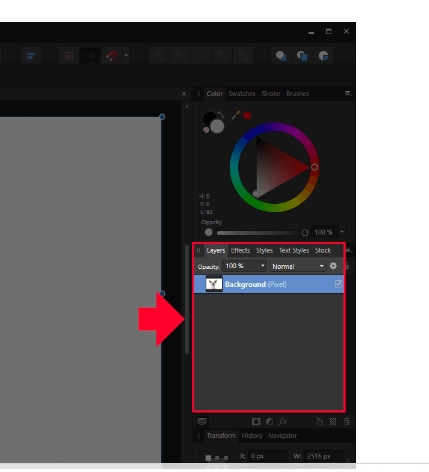
Step2 Go to the “Layers” tab in the right pane, right-click your layer, and disable “Lock.” Now right-click on your layer again, and select “Rasterize” to enable editing of specific parts of the image.
Step3 To make a selection around your subject, first enable the “Snap To Edges” and “Soft Edges” feature from the top toolbar. This will help you automatically detect the edges and give it a more tapered finish.

Set your brush size using your keyboard’s left and right bracket keys. Now, manually make a selection around your subject and white edges in the image as precisely as possible.
Step4 Next, zoom in on your subject. Press & hold the ALT key on your keyboard, and use the Selection Brush tool to manually correct the rough edges of your outline.
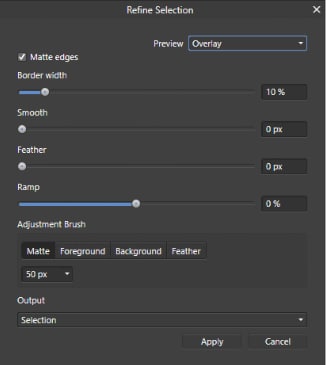
Click the “Refine” option in the toolbar to open the “Refine Selection” menu. A red mask will be applied to your subject, giving you an idea of how your image will look once you remove the background. Zoom in and if any details are excluded, paint them over. Once you are satisfied, click “Apply” to save your changes.
Step5 In the last step, press the “Delete” key on your keyboard to remove the background, or click “Edit” and choose the “Cut” option.
Now, hit “Control+D” to deselect the selection. Alternatively, you can click “Select” in the top toolbar and choose the “Deselect” option. Finally, you can export your file using the “File” > “Export” option.
How to Remove a Busy Background in Affinity Designer
If you want to remove a busy background of an image in the Affinity Designer software, follow these steps carefully:
Step1 Click the “File” option in Affinity Designer and select “Open” from the drop-down menu. Select your image and click “Open” to import your picture.
From the right-side panel, open the Layers tab and click the “Lock” icon to unlock your image layer, which is set as locked by default. Now, right-click on the layer and select “Rasterize & Trim.” Rasterization will help remove the background.
Step2 Next, you have to make a selection around your object/subject in the picture. Click the “Selection Brush” tool from the left-side panel to do so.
Now your cursor will be changed to a circle. To increase or decrease the brush size, use the Right and Left Bracket keys on your keyboard. Now, move around the brush on your image to outline your subject.
Step3 Once you’ve made a selection around your object, it’s time to refine it to make it more precise. To do so, click the “Refine” option from the top toolbar to open the “Refine Selection” menu.
Focus on the Foreground and Background brushes in the Refine Selection menu and toggle between these settings to make your selection more accurate. You can use the Right or Left Bracket key on your keyboard to adjust the brush size where needed.
Once satisfied with your changes, click the “Apply” option in the Refine Selection menu to save your settings.
Step4 Now that you’ve outlined your subject clearly and precisely, it’s time to remove the busy background. To do so, click the Delete key on your keyboard if you use a Windows PC.
If you are using a Mac system, click “Edit” in the toolbar and select “Cut” from the drop-down menu. Your background will be removed and changed to a checkboard pattern.
Step5 In this last step, you must deselect the outline around your subject. For this, press the “Control+D” key on your keyboard or click “Select” in the toolbar and choose the “Deselect” option.
Finally, click “File” and select the “Export” option from the drop-down menu. Then, in the Export Settings menu, choose PNG and click “Export” to save your file on your PC.
![]()
Note: To save your image with a transparent background, do not export it in JPG file format.
The Best Alternative of Affinity Photo
Since Affinity Photo is a desktop software available for a one-time purchase of $40.99, you might be looking for an online free alternative if you need more space or can afford the subscription fee.
Therefore, we recommend using Wondershare PixCut , an advanced AI-based online tool developed byWondershare Technology.
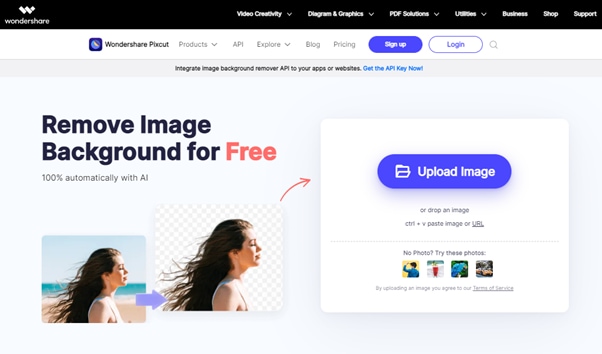
Editing experts recommend Wondershare PixCut as the best alternative to many editing problems. An AI-powered automatic editing tool, this software has quicker solutions for you when it comes to removing an image’s background. Some of its many benefits are:
- Offline and online image editing tools.
- Removes the background in just three steps. Upload an image, automatically remove the background, and get a pleasing image result.
- Offers a transparent image background that can be replaced.
- Helps in unblurring an image.
- No previous editing expertise is required as it is AI-powered automatic tool.
- Bulk removes backgrounds of up to 30 images, uploading them all at once.
- Removes watermarks, scratches, text, and any other imperfections from your images.
- Enlarge your images without losing their quality.
- Integrates the image background API into other apps and websites.
- Can be downloaded on Windows, Mac, and Android.
- Create a free account for easier future access.
- Paid and customized accounts for premium benefits.
- Customized categories that include e-commerce, car dealership, social media, graphic designing, personal, and marketing use.
Conclusion
This article discusses removing a background in Affinity Photo, whether the image has a white or a busy BG.
With advancing technology, you can find different image editing tools online. However, only a few of them can deliver the promised results. Therefore, you need to choose carefully to save time and effort. Please read our complete guide to learn more about removing an image’s background .
And if you have any interests in finding free images to expand your resource, you can watch this video:
Hopefully, this article and video can help you create ideal images!
Also read:
- [New] In 2024, Best Zoom Tools for Clear Session Capture
- [New] In 2024, The Full Story on Instagram's Video Length
- [New] The Editor's Arsenal Advanced Techniques in Chromatic Tuning
- [New] Tips for a Smooth Transition Into VR Worlds
- [New] Tutorial Transforming Photos Into Works of Art
- [New] Unveiling the Secrets of SDR-to-HDR Enhancement Techniques
- [Updated] In 2024, Diving Into the World's Best Free Online Editing and Visual Effects Sites
- [Updated] Transform Moments with These Premium Screenshot & Video Editing Apps
- 4 Methods to Turn off Life 360 On Samsung Galaxy A14 5G without Anyone Knowing | Dr.fone
- Exciting Times for Everyone: GPT-4 Is Now Free; Plus Still Shines with 6 Benefits.
- How To Unlock Honor 90 Phone Without Password?
- In 2024, Easy Guide to Sony Xperia 10 V FRP Bypass With Best Methods
- In 2024, The Economics of Entertainment PewDiePie's Profit
- In 2024, The Ultimate Guide for a Smart 4K Lens Upgrade
- New Video Invitation Apps That Will Make Your Event Unforgettable
- Title: In 2024, Uncluttered Focus Affinity Photo's Cleanup Technique
- Author: Daniel
- Created at : 2024-10-31 17:17:16
- Updated at : 2024-11-02 17:14:09
- Link: https://some-skills.techidaily.com/in-2024-uncluttered-focus-affinity-photos-cleanup-technique/
- License: This work is licensed under CC BY-NC-SA 4.0.