
In 2024, Unlocking Timelapse Magic with Your GoPro
Unlocking Timelapse Magic with Your GoPro
GoPro cameras are small and easy to use, you can record video or take photos from almost any angle with one of these cameras. They’re also easy to mount on almost any surface i-e., mounting onto your bike helmet makes it easy to capture every moment on your ride, so that it doesn’t matter where you are, you’ll be able to capture what’s happening around you.
GoPro time-lapse is a way to view the world from your camera’s point of view. It allows you to see everything that happened in a short period, either as it happens or over several days. You can use GoPro time-lapse to make videos about your daily life, or even about events like weddings, and vacations. You can use GoPro time-lapse for a more serious purpose.
There are many different cameras available on the market today that will work with GoPro time-lapse. Time-lapse videos are filmed at a constant speed and then edited together to create a video that shows the passage of time in real-time. In this blog post, we’ll explore why GoPro time-lapse is important, and how it can help you capture your memories.

Part 1: What is GoPro Time-lapse Video Mode
GoPro time-lapse video mode allows you to create a video that shows the passage of time over a period of days or weeks. The video is created by taking photos at regular intervals and then editing them together so that they appear to run in real-time. One of the most popular uses of GoPro time-lapse videos is when you want to capture something in motion.
You can use this technique for many different types of subjects including landscapes, cars, people, and animals and you can even add sounds like birds chirping or waves crashing along with them! It’s also possible to make this type of video if you’re using any other camera brand than GoPro itself. This method produces high-quality videos that can be used as promotional material.
The GoPro time-lapse creates the final video by stitching together the individual still images into one long clip. The software also allows you to manipulate each frame individually, which can be used to adjust the focus and exposure settings of your shot. GoPro Time-lapse videos are videos that show a sequence of events over a substantial period.
 With Screensaver Wonder you can easily make a screensaver from your own pictures and video files. Create screensavers for your own computer or create standalone, self-installing screensavers for easy sharing with your friends. Together with its sister product Screensaver Factory, Screensaver Wonder is one of the most popular screensaver software products in the world, helping thousands of users decorate their computer screens quickly and easily.
Part 2: How to Shoot Time-lapse Video with GoPro
If you’re a videographer or photographer, you’ve probably considered shooting time-lapse videos. They’re great for showing the passage of time, but they can also be used to show the beauty of a place. With GoPro cameras, you can create a time-lapse video in just minutes. Here’s how to shoot your time-lapse video with GoPro.
Step1 Choose your shooting mode
Firstly, choose the shooting mode, that is which kind of mode you want. If you want to shoot a time-lapse video then first click on the mode button and select the video mode. The video mode will be shown on the front screen after pressing it.
Step2 Select the time-lapse mode
Press the set-up button and go to the video settings which are held on the left side. After that click on the time-lapse video. There are many features and options in HERO8. There is a night lapse option in GoPro which is normally used in night photography. We can use this feature when there is limited lighting. The time-lapse mode was used in earlier models.
Step3 Change the interval settings
Choosing the correct interval settings is essential to creating a professional-looking time-lapse video. The interval time is the amount of time between each frame in your video. 30 FPS is used by GoPro time-lapse which means 30 pictures are required for a one-second video. The first step to shooting a GoPro time-lapse video is choosing the interval settings.
This can be done through GoPro’s settings menu, which can be accessed by tapping the icon in the upper right corner of the main screen, then tapping “Settings” in the menu that appears. the camera will take pictures every few seconds while recording video, which is great if you’re trying to hit a certain number of frames per second (FPS).
Step4 Mount your GoPro and click on the shutter button
If you want to shoot time-lapse videos on a GoPro, first you’ll need to mount your camera. Then press the shutter button on your camera and start shooting. Attach the camera to the tripod with the adhesive mount provided. Set up your camera by adjusting the settings for exposure, ISO, and other options in the Settings menu (you can find these settings in the Settings tab)
You’ll probably want to use a wide-angle lens for this kind of video because you’ll want to capture as much of your surroundings as possible. If you want to change the length of time you want to shoot, press the button again until it says “Time Lapse” or whatever setting you want.
Step5 Press the Shutter Button to End Shooting
When you are done with your shooting press the shutter button to end the shooting. GoPro will automatically combine all your clicked photos in a single video. You don’t need to do anything to combine the photos. The best part about this camera is that you can use it to shoot both vertical and horizontal time-lapses, as well as time-lapse photos.
Part 3: How to Edit Time-lapse Video on Computer
Editing time-lapse videos can be a bit tricky, but with the right tools and a little bit of practice, you can create some stunning time-lapse videos that will amaze your friends and family. Time-lapse videos are a great way to capture the beauty of the world around us, and with the right editing. Here’s a quick rundown of what you’ll need to edit a time-lapse video on your computer:
A video editing software like Adobe Premiere or Filmora , A time-lapse video editing plugin (optional), and A stable internet connection. Once you have all of the above, you’re ready to start editing your time-lapse video.
Step1 You’ll need to gather your video clips. You can either create your time-lapse video or download one from the internet. Once you have your video clips, you’ll need to import them into your video editing software.
Step2 Choose your timeline settings. Make sure your timeline is set to at least 30fps (frames per second).
Step3 You’ll need to be careful not to over-edit it and make it look choppy.
Step4 And finally, you’ll want to add some music or other sound to the video to make it more engaging. With these tips in mind, let’s take a look at how to edit time-lapse videos on your computer.


Why Filmora is the best?
Filmora is a powerful video editing software that enables users to create beautiful and professional-looking videos with ease. The software comes with a wide range of features and tools that give users the ability to create stunning videos. With Filmora, users can create videos for any purpose, whether it be for business or personal use. The software is a user-friendly interface.
There are many reasons why Filmora is the best video editing software for beginners. It is easy to use, has a simple interface, and is affordable. Additionally, Filmora has a wide range of features that can be used to create professional-looking videos. Filmora is free, with a wide range of pricing options to suit your budget.
Some of the most popular features of Filmora include its drag-and-drop interface, its wide range of built-in video effects, and its ability to create videos in 4K resolution. Additionally, Filmora offers a variety of templates and tools that can be used to further customize your videos. If you are looking for video editing software that is easy to use and has a wide range of features.
How to edit a time-lapse video in Filmora?
Filmora video editing software is easy to use, it has a non-destructive workflow and the ability to edit 4K videos. It also has some useful features like stabilization and color correction. With Filmora, you can easily create time-lapse videos by setting the frame rate and duration of the video. There are a few steps to edit a time-lapse video in Filmora, let’s have a look at those steps.
Free Download For Win 7 or later(64-bit)
Free Download For macOS 10.14 or later
Step1 Import photos to Filmora
After installing Filmora click on create on “New Project”. Select multiple photos and import them to Filmora. You can simply drag and drop the photos into it.


Step2 Placed videos on your timeline
After selecting photos or videos, put the photos in your timeline. Preview your photos for any adjustment or editing.
 Easy GIF Animator is a powerful animated GIF editor and the top tool for creating animated pictures, banners, buttons and GIF videos. You get extensive animation editing features, animation effects, unmatched image quality and optimization for the web. No other GIF animation software matches our features and ease of use, that’s why Easy GIF Animator is so popular.
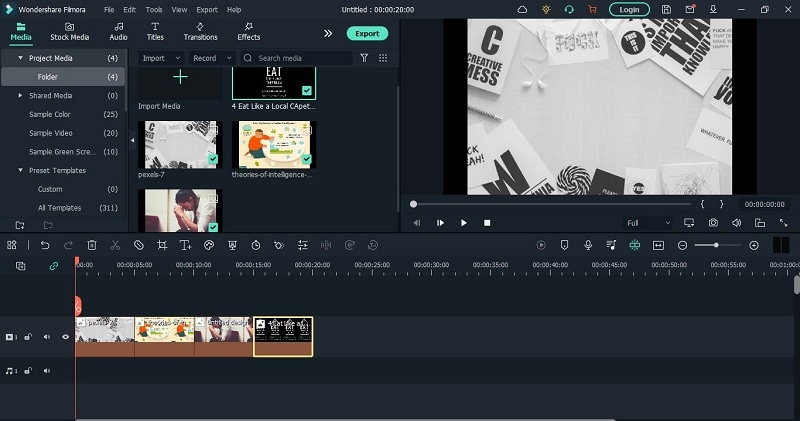
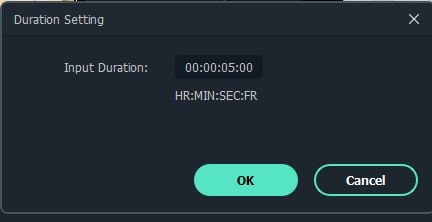
Step3 Adjust the duration of the time-lapse video
Select any photo then click on the timer symbol to set the duration of the photo.
Step4 Export your video
You can also add some transitions and effects to your video. After editing the video you can export it to your drive or anywhere.

Conclusion
GoPro cameras are great for time-lapse photography because they are designed to capture high-quality pictures and videos. To use GoPro for time-lapse shooting, simply set up the camera and mount it in a location that will allow it to capture a wide field of view. Once you have collected enough pictures, you can use video editing software to create a time.
GoPro cameras are ideal for time-lapse photography thanks to their small size, wide field of view, and shooting capabilities. GoPro cameras are an excellent means of documenting a space or event in motion, but the main thing is you always need an editing tool for your photograph so you can choose Filmora software. Filmora is one of the professional tools for editing photos and videos.
- Title: In 2024, Unlocking Timelapse Magic with Your GoPro
- Author: Daniel
- Created at : 2024-08-21 02:47:34
- Updated at : 2024-08-22 02:47:34
- Link: https://some-skills.techidaily.com/in-2024-unlocking-timelapse-magic-with-your-gopro/
- License: This work is licensed under CC BY-NC-SA 4.0.