
Mastering the 'History' Function in Linux: A Step-by-Step Guide

Mastering the ‘History’ Function in Linux: A Step-by-Step Guide
Quick Links
- What is Linux Command History Used For?
- The history Command
- Repeating Commands
- Searching for Commands by String
- Interactive Search
- Modifying the Last Command
- Deleting Commands from the History List
- Manually Updating the History File
- Clearing the History List
- Security and the History File
- The .bashrc File
- Using Timestamps
Linux’s shell saves a history of the commands you run, and you can search it to repeat commands you’ve run in the past. Once you understand the Linux history command and how to use it, it can significantly boost your productivity.
What is Linux Command History Used For?
The Linux history command allows you to review and repeat your previous commands. This isn’t intended to just encourage laziness or save time—there’s also an efficiency (and accuracy) factor at play. The lengthier and more complicated a command is, the harder it is to remember and type without making an error. There are two types of errors: one that prevents the command from working, and one that allows the command to work, but makes it do something unexpected.
The history command eliminates those issues. Like most Linux commands, there’s more to it than you might think . However, if you learn how to use the history command, it can improve your use of the Linux command line, every single day. It’s a good investment of your time. There are far better ways to use the history command than just hitting the Up arrow repeatedly .
The history Command
In its simplest form, you can use the history command by just typing its name:
history

The list of previously used commands is then written to the terminal window.

The commands are numbered, with the most recently used (those with the highest numbers) at the end of the list.
To see a certain number of commands, you can pass a number to history on the command line. For example, to see the last 10 commands you’ve used, type the following:
history 10

You can achieve the same result if you pipe history through the tail command . To do so, type the following:
history | tail -n 10

Repeating Commands
If you want to reuse a command from the history list, type an exclamation point (!), and the number of the command with no spaces in-between.
For example, to repeat command number 37, you would type this command:
!37

To repeat the last command, type two exclamation points, again, without spaces:
!!

This can be useful when you issue a command and forget to use sudo . Type sudo, one space, the double exclamation points, and then hit Enter.
For the following example, we typed a command that requires sudo. Instead of retyping the whole line, we can save a bunch of keystrokes and just type sudo !!, as shown below:
mv ./my_script.sh /usr/local/bin/
sudo !!

So, you can type the corresponding number from the list to repeat a command or use the double exclamation points to repeat the last command you used. However, what if you want to repeat the fifth or eighth command?
You can use one exclamation point, a hyphen (-), and the number of any previous command (again, without spaces) to repeat it.
To repeat the 13th previous command, you would type the following:
!-13

Searching for Commands by String
To repeat the last command that starts with a particular string, you can type an exclamation point, and then the string with no spaces, and then hit Enter.
For example, to repeat the last command that started with sudo, you would type this command:
!sudo

There’s an element of danger in this, though. If the last command that started with sudo isn’t the one you think it is, you’ll launch the wrong command.
To provide a safety net, though, you can use the :p (print) modifier, as shown below:
!sudo:p

This instructs history to print the command to the terminal window, rather than executing it. This allows you to see the command before you use it. If it is the command you want, press the Up arrow, and then hit Enter to use it.
If you want to find a command that contains a particular string, you can use an exclamation point and question mark.
For example, to find and execute the first matching command that contains the word “aliases,” you would type this command:
!?aliases

This will find any command that contains the string “aliases,” regardless of where it appears in the string.
Interactive Search
An interactive search allows you to hop through a list of matching commands and repeat the one you want.
Just press Ctrl+r to start the search.

As you type the search clue, the first matching command will appear. The letters you type appear between the backtick (`) and the apostrophe (‘). The matching commands update as you type each letter.

Each time you press Ctrl+r, you’re searching backward for the next matching command, which appears in the terminal window.

When you press Enter, the displayed command will execute.

To edit a command before you execute it, press either the Left or Right arrow key.

The command appears on the command line, and you can edit it.

You can use other Linux tools to search the history list. For example, to pipe the output from history into grep and search for commands that contain the string “aliases” you could use this command:
history | grep aliases

Modifying the Last Command
If you need to fix a typo, and then repeat the command, you can use the caret (^) to modify it. This a great trick to have up your sleeve for whenever you misspell a command or want to rerun one with a different command-line option or parameter.
To use it, type (without spaces) a caret, the text you want to replace, another caret, the text you want to replace it with, another caret, and then press Enter.
For example, suppose you type the following command, accidentally typing “shhd” instead of “sshd”:
sudo systemctl start shhd
You could correct this easily by typing the following:
^shhd^sshd^

The command is executed with “shhd” corrected to “sshd.”
Deleting Commands from the History List
You can also delete commands from the history list with the -d (delete) option. There’s no reason to keep your misspelled command in the history list.
You can use grep to find it, pass its number to history with the -d option to delete it, and then search again to make sure it’s gone:
history | grep shhd
history -d 83
history | grep shhd

You can also pass a range of commands to the -d option. To delete all list entries from 22 to 32 (inclusive), type this command:
history -d 22 32
To delete only the last five commands, you can type a negative number, like so:
history -d -5
Manually Updating the History File
When you log in or open a terminal session, the history list is read in from the history file. In Bash, the default history file is .bash_history.
Any changes you make in your current terminal window session are only written to the history file when you close the terminal window or log out.
Suppose you want to open another terminal window to access the full history list, including commands you typed in the first terminal window. The -a (all) option allows you to do this in the first terminal window before you open the second.
To use it, type the following:
history -a

The commands are written silently to the history file.
If you want to write all changes to the history list to the history file (if you deleted some old commands, for example), you can use the -w (write) option, like so:
history -w

Clearing the History List
To clear all commands from the history list, you can use the -c (clear) option, as follows:
history -c

If you additionally want to force these changes to the history file, use the -w option, like so:
history -w
Security and the History File
If you use any applications that require you to type sensitive information (like passwords) on the command line, remember this will also be saved in the history file. If you don’t want certain information saved, you can use the following command structure to delete it from the history list immediately:
special-app my-secret-password;history -d $(history 1)
history 5
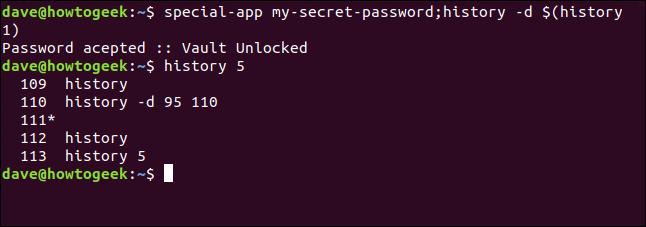
This structure includes two commands separated with a semicolon (;). Let’s break this down:
- special-app: The name of the program we’re using.
- my-secret-password: The secret password we need to provide for the application on the command line. This is the end of command one.
- history -d: In command two, we invoke the
-d(delete) option ofhistory. What we’re going to delete comes is in the next portion of the command. - $(history 1): This uses a command substitution. The portion of the command contained in the
$()is executed in a subshell. The result of that execution posts as text in the original command. Thehistory 1command returns the previous command. So, you can think of the second command as history -d “last command here.”
You can use the history 5 command to make sure the command containing the password was removed from the history list.
There’s an even simpler way to do this, though. Because Bash ignores lines that begin with a space by default, just include a space at the start of the line, as follows:
special-app another-password
history 5

The command with the password isn’t added to the history list. The reason this trick works is contained within the .bashrc file.
The .bashrc File
The .bashrc file executes each time you log in or open a terminal window. It also contains some values that control the behavior of the history command. Let’s edit this file with gedit .
Type the following:
gedit .bashrc

Near the top of the file, you see two entries:
**HISTSIZE**: The maximum number of entries the history list can contain.HISTFILESIZE: The limit for the number of lines a history file can contain.

These two values interact in the following ways:
- When you log in or start a terminal window session, the history list is populated from the
.bash_historyfile. - When you close a terminal window, the maximum number of commands set in
HISTSIZEare saved to the.bash_historyfile. - If the
histappendshell option is enabled, the commands are appended to.bash_history. Ifhistappendisn’t set,.bash_historyis overwritten. - After saving the commands from the history list to
.bash_history, the history file is truncated to contain no more thanHISTFILESIZElines.
Also near the top of the file, you see an entry for the HISTCONTROL value.
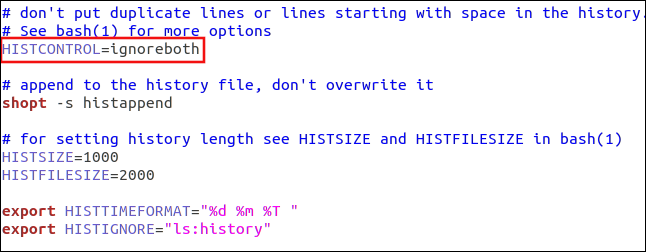
You can set this value to do any of the following:
**ignorespaces**:Lines that begin with a space aren’t added to the history list.**ignoredups**:Duplicate commands aren’t added to the history file.**ignoreboth**:Enables both of the above.
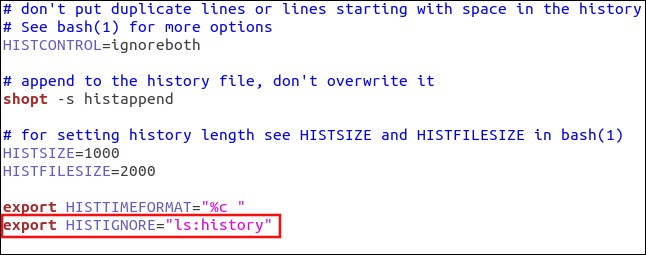
You can also list specific commands you don’t want added to your history list. Separate these with a colon (:) and put them in quotation marks (“…”).
You would follow this structure to add a line to your .bashrc file, and substitute the commands you want to be ignored:
export HISTIGNORE=”ls:history”
Using Timestamps
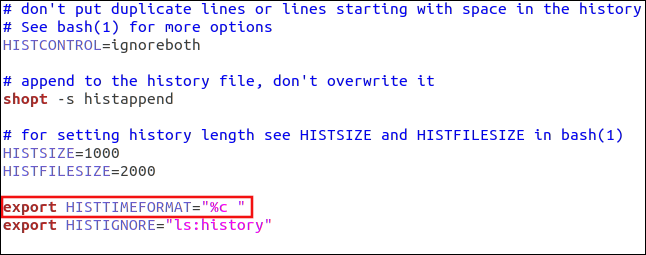
If you want to add timestamps to the history list, you can use the HISTIMEFORMAT setting. To do so, you just add a line like the following to your .bashrc file:
export HISTTIMEFORMAT=”%c “
Note that there’s a space before the closing quotation marks. This prevents the timestamp from butting up to the commands in the command list.
Now, when you run the history command, you see date- and timestamps. Note that any commands that were in the history list before you added the timestamps will be timestamped with the date and time of the first command that receives a timestamp. In this example shown below, this was command 118.
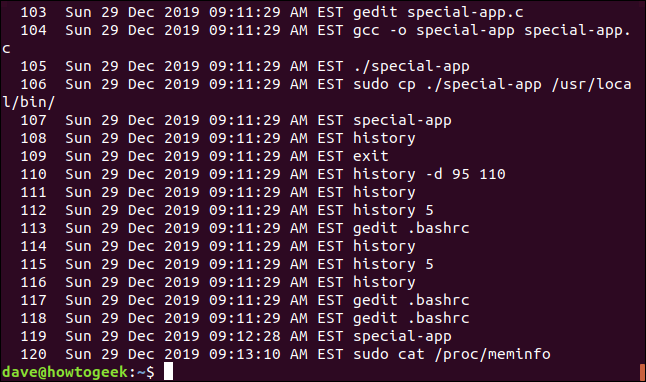
That’s a very long-winded timestamp. However, you can use tokens other than %c to refine it. The other tokens you can use are:
%d: Day%m: Month%y: Year%H: Hour%M: Minutes%S: Seconds%F: Full date (year-month-date format)%T: Time (hour:minutes:seconds format)**%c**: Complete date and time stamp (day-date-month-year, and hour:minutes:seconds formats)
Let’s experiment and use a few different tokens:
export HISTTIMEFORMAT=”%d n%m %T “
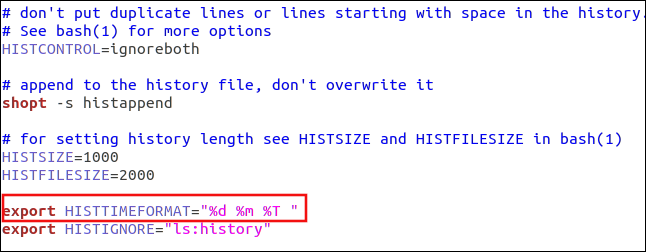
The output uses the day, month, and time.
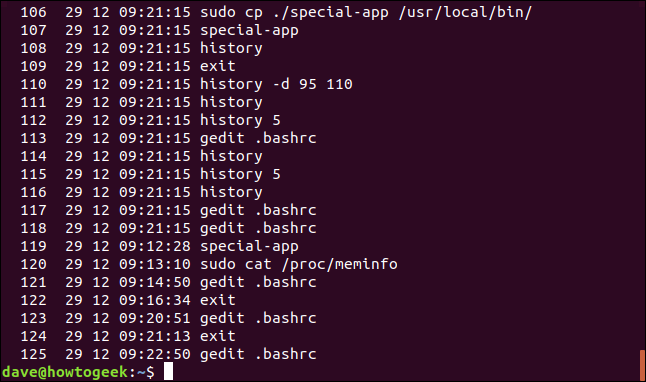
If we remove the day and month, though, it will just show the time.
Any changes you make to HISTIMEFORMAT apply themselves to the entire history list. This is possible because the time for each command is stored as the number of seconds from the Unix epoch . The HISTTIMEFORMAT directive simply specifies the format used to render that number of seconds into a human-readable style, such as:
export HISTTIMEFORMAT=”%T “
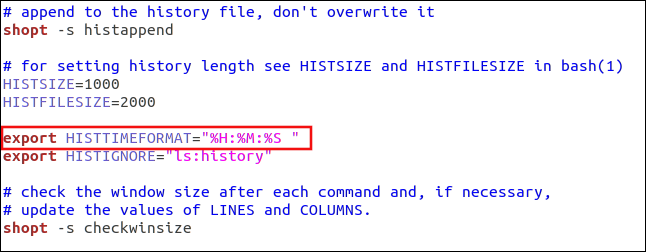
Our output is now more manageable.

You can also use the history command to audit. Sometimes, reviewing commands you’ve used in the past can help you identify what might have caused an issue.
Just as you can in life, on Linux, you can use the history command to relive the good times and learn from the bad.
| | Linux Commands | | |
| —————– | ———————————————————————————————————————————————————————————————————————————————————————————————————————————————————————————————————————————————————————————————————————————————————————————————————————————————————————————————————————————————————————————————————————————————————————————————————————————————————————————————————————————————————————————————————————————————————————————————————————————————————————————————————————————————————————————————————————————————————————————————————————————————————————————————————————————————————————————————————————————————————————————————————————————————————————————————————————————————————————————————————————————————————————————————————————————————————————————————————————————————————————————————————————————————————————————————————————————————————————————————————————————————————————————————————————————————————————————————————————————————————————————————————————————————————————————————————————————————————————————————————————————————————————————————————————————————————————————————————————————————————————————————————————————————————————————————————————————————————————————————————————————————————————————————————————————————————————————————————————————————————————————————————————————————————————————————————————————————————————————————————————————————————————————————————————————————————————————————————————————————————————————————————————————————————————————————————————————————————————————————————————————————————————————————————————————————————————————————————————————————————————————————————————————————————————————————————————————————————————————————————————————————————————————————————————————————————————————————————————————————————————————————————————————————————————————————————————————————————————————————————————————————————————————————————————————————————————————————————————————————————————————————————————————————————————————————————————————————————————————————————————————————————————————————————————————————————————————————————————————————————————————————————————————————————————————————————————————————————— | |
| Files | tar · pv · cat · tac · chmod · grep · diff · sed · ar · man · pushd · popd · fsck · testdisk · seq · fd · pandoc · cd · $PATH · awk · join · jq · fold · uniq · journalctl · tail · stat · ls · fstab · echo · less · chgrp · chown · rev · look · strings · type · rename · zip · unzip · mount · umount · install · fdisk · mkfs · rm · rmdir · rsync · df · gpg · vi · nano · mkdir · du · ln · patch · convert · rclone · shred · srm · scp · gzip · chattr · cut · find · umask · wc · tr | |
| Processes | alias · screen · top · nice · renice · progress · strace · systemd · tmux · chsh · history · at · batch · free · which · dmesg · chfn · usermod · ps · chroot · xargs · tty · pinky · lsof · vmstat · timeout · wall · yes · kill · sleep · sudo · su · time · groupadd · usermod · groups · lshw · shutdown · reboot · halt · poweroff · passwd · lscpu · crontab · date · bg · fg · pidof · nohup · pmap | |
| Networking | netstat · ping · traceroute · ip · ss · whois · fail2ban · bmon · dig · finger · nmap · ftp · curl · wget · who · whoami · w · iptables · ssh-keygen · ufw · arping · firewalld | |
Also read:
- [New] Planning a Dynamic TikTok Outro Experience for 2024
- [New] Strategic Approach to Crafting YouTube Content Headlines
- [New] Techniques to Weave Narrative Into Visual Content
- [Updated] In 2024, 2023 | How to Download Facebook Status Videos?
- [Updated] Streamlining Speech-To-Text Processing in Powerpoint
- [Updated] The Beginner's Pathway to Custom Vocalization Expert Tips on Modifying Sounds (Free)
- [Updated] Unveiling the Perfect Process IPhone's Podcast Downloading Technique
- [Updated] YouTube Snippets Guide Essential Insights Unveiled
- 2024 Approved USB-C Revolution in Monitors HP Envy 27'S Journey
- Crash No More: Effective Strategies to Stabilize Your Rust Applications
- Did Your Apple iPhone 12 mini Passcode Change Itself? Unlock It Now
- How to Update iPhone 15 without Losing Data? | Dr.fone
- In 2024, How to Time Your Instagram Content For Max Engagement
- In 2024, Unleashing Creativity Harnessing the Full Potential of Movie Maker (Windows 8)
- In-Depth Analysis of Amazon Fire HD 10 Kids Edition: Exceptional Kid-Friendly Safeguards
- Streamlined Social Integration Linktree and TikTok Profiles United for 2024
- Title: Mastering the 'History' Function in Linux: A Step-by-Step Guide
- Author: Daniel
- Created at : 2025-03-05 01:54:24
- Updated at : 2025-03-05 23:23:31
- Link: https://some-skills.techidaily.com/mastering-the-history-function-in-linux-a-step-by-step-guide/
- License: This work is licensed under CC BY-NC-SA 4.0.