Securing Your System: A Step-by-Step Guide to Locking a Windows 10 PC via Command Line

Securing Your System: A Step-by-Step Guide to Locking a Windows 10 PC via Command Line
Quick Links
- Lock Your Windows 10 PC Using Command Prompt
- Set the Lock Screen Timeout Setting Using Command Prompt
Key Takeaways
- To lock your Windows PC using Command Prompt, run “Rundll32.exe user32.dll,LockWorkStation” in the Command Prompt
- To set the lock screen timeout, run “powercfg.exe /SETACVALUEINDEX SCHEME_CURRENT SUB_VIDEO VIDEOCONLOCK in Command Prompt as Admin
- Activate the lock screen timeout setting by running “powercfg.exe /SETACTIVE SCHEME_CURRENT” after you set the timeout.
One of the first rules of cyber security is to always lock your PC before stepping away. While it may not be the quickest way to lock your Windows 10 PC, you can do it using the Command Prompt.
Lock Your Windows 10 PC Using Command Prompt
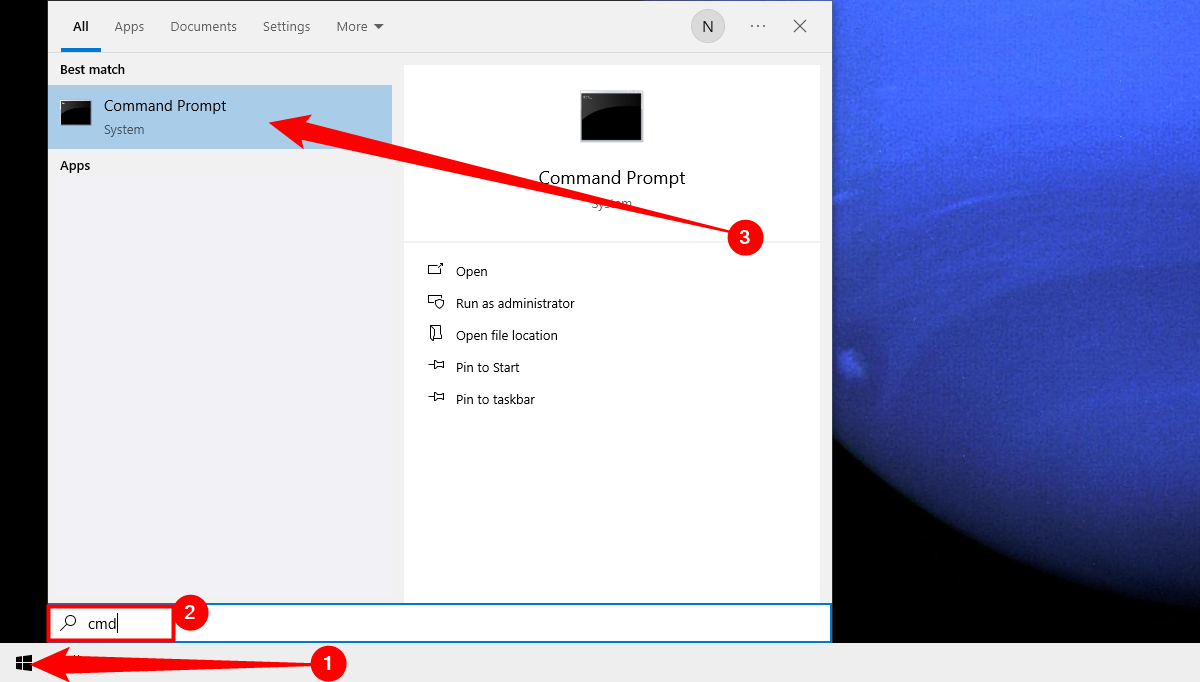
First, open the Command Prompt on your PC by opening the Start menu, typing “cmd” in the Windows Search bar, and then selecting “Command Prompt” from the search results.

Command Prompt will now open. Here, run this command to lock your Windows 10 PC.
Rundll32.exe user32.dll,LockWorkStation

Once executed, your PC will be locked. You’ll have to sign back in with your PIN, password, or whatever sign-in method you usually use.
Set the Lock Screen Timeout Setting Using Command Prompt
Once you’ve locked your PC, the lock screen will generally be displayed for a certain amount of time before it time outs. You can set the amount of time that needs to pass before timing out using the Command Prompt.
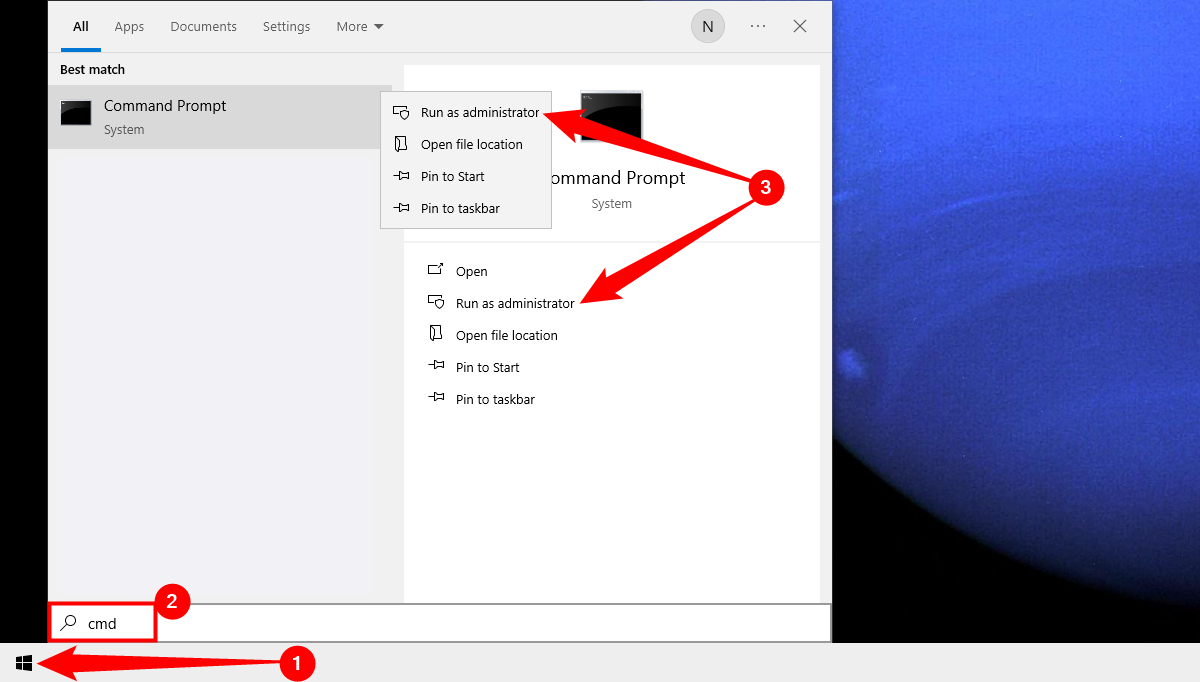
To do this, you’ll need to open Command Prompt as an admin . Do so by typing “cmd” in the Windows Search bar and then right-clicking “Command Prompt” from the results. Next, select “Run As Administrator” from the menu that appears.

With Command Prompt open, run this command.
powercfg.exe /SETACVALUEINDEX SCHEME_CURRENT SUB_VIDEO VIDEOCONLOCK
Replace <time> with your desired amount of time in seconds. That means if you want to time out the lock screen after two minutes, you’d enter this command:
powercfg.exe /SETACVALUEINDEX SCHEME_CURRENT SUB_VIDEO VIDEOCONLOCK 120

This command sets the lock screen timeout setting for your PC if it’s plugged in to a power source. To set the lock screen timeout setting for your PC if it’s running on battery, change/SETACVALUEINDEX to/SETDCVALUEINDEX and run the command as normal.
Next, run this command:
powercfg.exe /SETACTIVE SCHEME_CURRENT

Now your lock screen will timeout after the set amount of time. Give it a try!
Also read:
- [New] Tips for Reducing VR-Induced Symptoms
- [New] Twitter's Video Standards Focus on Aspect Ratios
- [New] Ultimate Plugins List After Effects Edition
- [New] Unveiling Windows 11 A Compreayer to Master Video Editing Techniques
- 2024 Approved Expertly Edit Your Imagery with Top Android/iOS Montage Apps
- 2024 Approved Infusing Vitality Into Text An Animated Adventure
- 2024 Approved The Ultimate Sound Guide for Your Android Device's Customization
- From Novice to Scholar: Top Language Examination Guides
- Get the Most From Your Fitness Journey with Effective ChatGPT Interaction Techniques for Exercise Enthusiasts
- How to Resolve 'Alienware Command Center Not Responding' Error Messages
- In 2024, Unveiling Public Domain Paintings Insights & Links
- Insta-Interruption: The Strategy Behind Urging a Social Media Vacation
- Step-by-Step Tutorial on Saving Instagram TV Shows for Later Enjoyment Without Internet Access
- The Authoritative Handbook on Selecting Impactful Podcast Monikers, Plus Examples for 2024
- Ultimate guide to get the meltan box pokemon go For OnePlus Nord CE 3 5G | Dr.fone
- Title: Securing Your System: A Step-by-Step Guide to Locking a Windows 10 PC via Command Line
- Author: Daniel
- Created at : 2025-03-02 22:30:59
- Updated at : 2025-03-06 02:47:21
- Link: https://some-skills.techidaily.com/securing-your-system-a-step-by-step-guide-to-locking-a-windows-10-pc-via-command-line/
- License: This work is licensed under CC BY-NC-SA 4.0.