
Techniques for Smooth Audio Amplification in Lumafusion for 2024
Techniques for Smooth Audio Amplification in Lumafusion
LumaFusion, a mobile video editing powerhouse with an intuitive LumaFusion music fade out, simple-to-understand UI/UX, is accessible for use on both iOS devices i-e iPhones and iPads. LumaFusion audio fade out provides a whole video editing experience that you can use anywhere, from cutting a movie to instantly exporting to YouTube. With LumaFusion, you can edit video, still photos, and audio on an iPad or iPhone with a degree of accuracy and quality that is very comparable to that of a desktop computer.
Video editors should give LumaFusion a try if they want to use its compact LumaFusion fade audio editing feature. And before diving in head first with more sophisticated tools, novices who wish to learn how to edit video should give it considerable consideration. From the iOS camera roll, a cloud service like Dropbox or Google Device, or a USB drive linked to an iPhone or iPad, you may edit images and videos in addition to editing fade out audio LumaFusion. Learn more about the process here.
Part 1. How to Fade Audio with LumaFusion
There are several capabilities in Luma Fusion that make precise editing possible, including ones that we haven’t seen in other mobile editing tools, such keyframing for all effects. Beginning filmmakers may use LumaFusion to discover their voice via editing. Their work may be moved to a desktop software after their abilities have grown on mobile. To start fading audio using Luma Fusion, follow these steps:
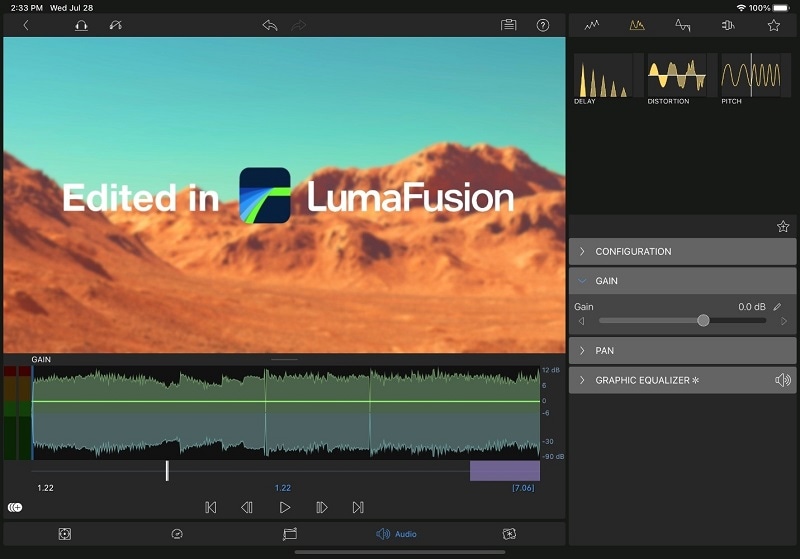
Step1 LumaFusion’s default structure is comparable to that of many desktops editing programs: a multitrack timeline along the bottom, a media browser in the upper left, and a preview monitor that, depending on what you last chose, either displays a source clip or your timeline edit.

Step2 LumaFusion allows for the automated synchronization of up to 12 camera sources and several audio tracks. When a clip is loaded into LumaFusion, touch on it to open it in the viewer and then adjust the start and finish points.
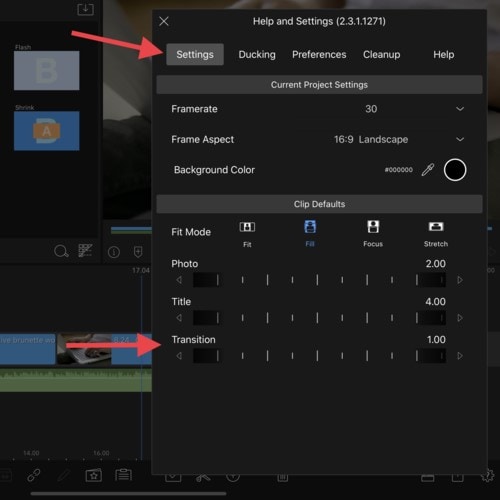
Step3 From the choices, choose the Cross Dissolve (Fade) transition. The transition should be placed at the very end of your music channel timeline. Tap on the Help & Settings menu to do this action. Look for Transition under the Settings menu and edit it to the appropriate duration. If you do this, your transition won’t take effect until you add it again.

Beyond simple editing, LumaFusion excels in enhancing projects with a wide variety of built-in effects, transitions, titles, and color correction. It also has a limited (but excellent) collection of royalty-free music. Finally, LumaFusion Project Packages are a terrific solution to regularly backup a project for security or to complete altering it. After choosing Export, choose the Project Package from the list.
Part 2. LumaFusion Alternative Way to Fade Audio in Video
A multi-track video editor made specifically for mobile devices is called LumaFusion. Journalists, filmmakers, and expert video producers often utilize it to create engrossing video narratives. But if you have a toolkit with everything you need already built in so you can use it as needed, fading is unexpectedly made simple. Wondershare Filmora does this task faster than ever because to its user-friendly interface, which makes audio editing in Filmora a breeze.
You’ve frequently thought about faking in and out with your audio since it might have negative effects, such not meeting the expectations of your video viewers. Together, using fade in/fade out music and the Filmora , the song’s loudness will progressively drop toward the finish. The finest feature of this all-in-one package software is that it is a convenient and simple platform, especially for novices. Since audio fading is your main worry, it is obvious for you to choose this program.
Free Download For Win 7 or later(64-bit)
Free Download For macOS 10.14 or later
Step1 Download Filmora and Set It Up
You must first download and set up Filmora by clicking one of the links i-e for Windows or for the Mac version. Visit the official website to download its latest version.
Now that you’ve downloaded the software’s executable file, the next step is to install it properly. To do this, simply follow the basic installation instructions, which will undoubtedly result in the successful installation of this user-friendly application.
Step2 Import Audios to Fade
Drag and drop your sound recordings from the media library to the timeline at the bottom of the program when they have been successfully imported. You may now see your audio files inside the timeline, where you can easily crop the video or reduce the audio of the relevant audio file. You may utilize basic to sophisticated editing techniques inside the program. To choose the basic editor, just click on the video file within the timeline as shown below:

Step3 Apply Fade Effects
The fade-in audio button inside your audio file may be seen when you just hover over the audio file within the timeline and look for the white circle filled with pink hue at the beginning and finish of your audio file. On the other hand, to choose the fade-out audio, click and drag the pink circle that appears on the opposite end of the audio file in the timeline that you have chosen to fade out the music file.

Step4 Share and export
After finishing the method for editing audio in Filmora, click the Export button in the top menu corner as shown here:
In that window, you can select the MP3 format in the format customization box to continue with storing your file to your system. After making any necessary adjustments to the audio file, click the Export button below, which will ultimately direct you to the area on your PC where you want to store the audio.
Part 3. Related FAQs about LumaFusion
1. How do you fade in a title LumaFusion?
Go to Clip Defaults to do that. You may change the Title and Transition lengths here. Check to check whether the updated defaults have been implemented by adding a new title or transition after making the necessary modifications. By cursorily browsing the title in the browser, you can get a preview.

Key features:
• Import from any devices and cams, including GoPro and drones. All formats supported. Сurrently the only free video editor that allows users to export in a new H265/HEVC codec, something essential for those working with 4K and HD.
• Everything for hassle-free basic editing: cut, crop and merge files, add titles and favorite music
• Visual effects, advanced color correction and trendy Instagram-like filters
• All multimedia processing done from one app: video editing capabilities reinforced by a video converter, a screen capture, a video capture, a disc burner and a YouTube uploader
• Non-linear editing: edit several files with simultaneously
• Easy export to social networks: special profiles for YouTube, Facebook, Vimeo, Twitter and Instagram
• High quality export – no conversion quality loss, double export speed even of HD files due to hardware acceleration
• Stabilization tool will turn shaky or jittery footage into a more stable video automatically.
• Essential toolset for professional video editing: blending modes, Mask tool, advanced multiple-color Chroma Key
2. How do you do transitions in LumaFusion?
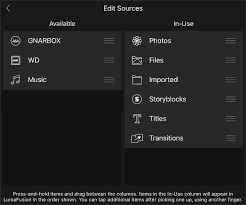
There are several eye-catching transitions included with LumaFusion. The transition may simply be dragged into the timeline and placed between the two pertinent segments. You may modify the duration of it after it’s on the timeline in the same way that you would any other clip. Simply choose Transitions from the Sources box, that’s it.
 Easy and Safe Partition Software & Hard Disk Manager
3. How to you split audio and video in LumaFusion?
Within the timeline, tap anywhere and move the mouse left or right to divide a clip in half. The audio from your clip may then be separated in the timeline. To do so, choose the audio channel and then click the pencil-shaped edit button at the bottom of the screen. This will display a variety of choices, including tools for pan, distortion, and volume. The audio editing features in LumaFusion are virtually as spectacular as the visual options—and just as intimidating.
- Title: Techniques for Smooth Audio Amplification in Lumafusion for 2024
- Author: Daniel
- Created at : 2024-08-21 02:35:50
- Updated at : 2024-08-22 02:35:50
- Link: https://some-skills.techidaily.com/techniques-for-smooth-audio-amplification-in-lumafusion-for-2024/
- License: This work is licensed under CC BY-NC-SA 4.0.